Quantcast
Channel: NETvNext Blog
Viewing all 63 articles
Browse latest View live

VBscript to Get Source Path of SCCM Packages in a File

$
0
0

In large SCCM environments managing hundreds or thousands of packages can get out of hand. This VB script allows you to obtain the source path of packages that you list in a text file (one package ID per line).


In the "Set these variables" section of the script, specify your SCCM site server name and the full path to the file containing the list of package IDs.


Run it from the command prompt like this:

cscript getSourcePathPkgsInFile.vbs > output.txt


(The output is redirected to output.txt)


The script is listed below but you can also download it from Microsoft's gallery in case the copy and paste operation breaks lines incorrectly.


' by Romano Jerez
' 2011


' Script gets the source path for packages listed in sourceFile (one package ID per line)


' *** SET THESE VARIABLES ***


SCCMServer = ""


sourceFile = "c:\packages.txt"


' ***************************


Const ForReading = 1


' Connect to SMS provider


set objSwbemLocator = CreateObject("WbemScripting.SWbemLocator")
 set objSWbemServices= objSWbemLocator.ConnectServer(SMSServer, "root\sms")
 Set ProviderLoc = objSWbemServices.InstancesOf("SMS_ProviderLocation")


For Each Location In ProviderLoc
       If Location.ProviderForLocalSite = True Then
           Set objSWbemServices = objSWbemLocator.ConnectServer(Location.Machine, "root\sms\site_" + Location.SiteCode)
       End If
       siteCode = Location.SiteCode
 Next


Set objShell = WScript.CreateObject("WScript.Shell")
 Set objFSO = CreateObject("Scripting.FileSystemObject")
 Set objFile1 = objFSO.OpenTextFile(sourceFile, ForReading) 


Do Until (objFile1.AtEndOfStream)
    pkgID = objFile1.Readline
    getPkgSource pkgID
 Loop


objFile1.Close


Sub getPkgSource(PKG)
    On Error Resume Next
    Set objPackage = GetObject("WinMgmts:!\\" & SCCMServer & "\root\SMS\site_" & siteCode & _
                               ":SMS_Package.PackageID='" & PKG & "'")


   If Err.Number <> 0 Then
       WScript.echo PKG & "," & "Invalid package - Error " & Err.Number & ": " & Err.Description
       Err.Clear
    Else
       WScript.Echo PKG & "," & objPackage.PkgSourcePath
    End If
 End Sub


Working with SCCM Site Boundaries

$
0
0
Planning of site boundaries in System Center Configuration Manager (SCCM) 2007 is essential for client site assignment and for determining if the client has a slow or fast connection.  If the IP subnet for a client is missing from site boundaries, the client's connection will be considered to be slow, and this may affect the functionality of software distribution or software updates if the advertisement or deployment is not configured properly.

We know that overlapping site boundaries cause issues and are unsupported by Microsoft.  A site boundary shouldn't be used in more than one site in your SCCM hierarchy.  But can you reuse a site boundary in a different SCCM hierarchy?  Not if both hierarchies publish to the same Active Directory (AD) forest.  Not if each hierarchy uses a Server Locator Point (SLP) and clients from one hierarchy query the SLP from the other hierarchy (they may be able to find it via WINS name resolution or Active Directory).  

Overlapping site boundaries can manifest themselves during a side-by-side SMS 2003 to SCCM migration.  Even if you remove the site boundaries from the SMS sites, they might still exist in Active Directory if the sites were publishing to AD and the site servers can no longer communicate with AD.  You may have the same boundaries published in AD from the SMS and the SCCM hierarchy.  You may also have configured a site to no longer publish to AD, but  this action alone won't delete the published data from AD.

In this post, I indicate several ways to obtain information that can assist you in troubleshooting issues caused by the configuration of site boundaries.  This can be used to compliment existing tools, such as a script developed by Russ Slaten to find overlapping boundaries.


Use ldifde.exe to query AD and obtain a list of subnet site boundaries

The following command (one line) outputs the subnet boundaries to a file called adSubnetBoundaries.txt.  Change the LDAP syntax to reflect your domain name.  The example below is for domain domain.com

ldifde -f adSubnetBoundaries.txt -d "cn=system management,cn=system,dc=domain,dc=com" -l name,objectClass,whenChanged,mSSMSRoamingBoundaries -r (objectClass=msSMSSite)"


Use ldifde.exe to query AD and obtain a list of IP range site boundaries

The following command (one line) outputs the IP range site boundaries to a file called rangeIPBoundaries.txt.  Change the LDAP syntax to reflect your domain name.  The example below is for domain domain.com.

ldifde -f rangeIPBoundaries.txt -d "cn=system management,cn=system,dc=domain,dc=com" -l name,objectClass,whenChanged,msSMSRangedIPLow,mSSMSRangedIPHigh -r "(objectClass=mSSMSRoamingBoundaryRange)"


Use custom SCCM report showing IP subnets of computers in a collection

This report queries the SCCM database so it is based on data that SCCM has received from systems.  This is the SQL query for the report:

SELECT SYS.Netbios_Name0, SUB.IP_Subnets0 FROM v_R_System SYS RIGHT JOIN v_RA_System_IPSubnets SUB ON SYS.ResourceID=SUB.ResourceID JOIN v_FullCollectionMembership FCM ON SYS.ResourceID=FCM.ResourceID WHERE FCM.CollectionID = @CollectionID GROUP BY SUB.IP_Subnets0, SYS.NEtbios_Name0


Query for collection prompt (Name: CollectionID)
begin
 if (@__filterwildcard = '')
   select v_Collection.collectionID, v_COllection.Name from v_Collection order by v_Collection.Name
 else
   select v_Collection.CollectionID, v_Collection.name from v_Collection
   WHERE v_cOllection.collectionID like @__filterwildcard
   order by v_COllection.Name
end


Use custom report to get computers in a collection using a specific IP subnet

SELECT SYS.Netbios_Name0, SUB.IP_Subnets0, SYS.Client0, SYS.Active0, SYS.Operating_System_Name_and0, OUN.System_OU_Name0 FROM v_R_System SYS RIGHT JOIN v_RA_System_IPSubnets SUB ON SYS.ResourceID=SUB.ResourceID JOIN v_RA_System_SystemOUName OUN ON SYS.ResourceID = OUN.ResourceID JOIN v_FullCollectionMembership FCM ON SYS.ResourceID=FCM.ResourceID WHERE FCM.CollectionID = @CollectionID AND SUB.IP_Subnets0 = @IPsubnet


This report has two prompts: CollectionID and IPsubnet.  The SQL query for CollectionID is the same as the one for the first report.  There's no SQL query for IPsubnet; you just enter the IP subnet manually.


Use custom report to get IP subnets in SCCM site boundaries

This report gets the IP subnets configured in SCCM as site boundaries.  It does not obtain IP range site boundaries.

select DISTINCT IPSubnet, SiteCode, DisplayName from v_SiteRoamingboundary_IPSubnet


IPv4 subnets in collection not in SCCM IPv4 subnet site boundaries

This report allows you to specify a collection, and it looks at all the IP subnets  being used by the systems in the collection according to SCCM.  It then checks to see if there's an IPv4 subnet site boundary in SCCM covering each of the IP subnets in the collection.  If any of the IP subnets being reported by the systems is not in the SCCM IPv4 subnet site boundaries, it is listed in the report.  Being listed in the report does not necessarily mean that the subnet is missing in the SCCM site boundaries, as an IP range site boundary in SCCM may be covering for it.

SELECT SUB.IP_SUbnets0, COUNT(*) AS num_systems
FROM v_R_System SYS RIGHT JOIN v_RA_System_IPSubnets SUB
ON SYS.ResourceID = SUB.ResourceID JOIN v_FullcollectionMembership FCM ON SYS.ResourceID = FCM.ResourceID
WHERE FCM.CollectionID = @CollectionID AND SUB.IP_Subnets0 NOT IN (SELECT IPSubnet FROM v_SiteRoamingBoundary_IPSubnet) GROUP BY SUB.IP_Subnets0

This report uses the same CollectionID prompt from the first report above.

How to Install the SCCM Client with Hotfixes

$
0
0
In a previous System Center Configuration Manager (SCCM) 2007 post, I illustrated how to automate the deployment of an SCCM hotfix to existing SCCM clients.  In this post, I write about installing the SCCM client with multiple SCCM hotfixes included using the following methods:

  • During Operating System Deployment Using a Task Sequence
  • Client Push to systems without the client. 
  • Client upgrade using SCCM Software Distribution to systems with the SCCM client.  


When an SCCM hotfix is installed on the server, if the hotfix needs to also be installed on the SCCM clients, a Microsoft Patch (.msp) file will be created in a sub-folder nested under the folder where the SCCM server is installed.  This patch file is what is installed on the client.  The path for the .msp file will be


<SCCM Install Directory>\Client\<platform>\hotfix\<hotfix KB number>


For example, when the SCCM hotfix KB977384 is installed on an x64 site server where the SCCM server installation directory is C:\Program Files (x86)\Microsoft Configuration Manager, the SCCM client patch file will be created at


C:\Program Files (x86)\Microsoft Configuration Manager\Client\i386\hotfix\KB977384


The folder where the SCCM site server is installed is shared automatically by the SCCM site server installation as SMS_XXX, where XXX is the three-code site code you entered during the install.  If the site code is for example ST1, then the share path for the client patch file for hotfix KB977384 on a server called SCCMCENTRAL will be


\\SCCMCENTRAL\SMS_ST1\client\i386\hotfix\KB977384


In this example, I'll illustrate how to include the following two hotfixes during the deployment of the SCCM client: KB977384 and KB2263826 (2509007 in task sequence).


Task Sequence Method


In the "Setup Windows and ConfigMgr" step, use the "Installation properties" section to specify the hotfixes using the syntax specified in the 977384 hotfix article.  


It is a good idea to help the SCCM client find the Management Point during operating system deployment (OSD) by specifying the SMSMP property (however make sure that you leave a space after the semicolon and before the PATCH property!).  Also the hotfixes must be entered in the order in which they were released.


Installing hotfixes 977384 and 2509007 in Task Sequence


Client Push Method


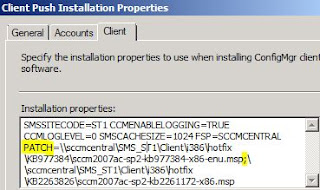
To include hotfixes using the SCCM client Push method, just use the PATCH property indicating the full network path to the .msp file, separating the path to multiple patch files using a semicolon.


However, it is common for the client push to fail in this scenario with error 1635.  When you look at the client.msi.log file on the client (at %windir%\ccmsetup), you might find the following error:


Unable to create a temp copy of patch <Network path to one of the .msp files>


The error is a bit misleading because the actual problem is that the target machine, using its System account, is not able to access the .msp file using its network share path.  Most likely, the System account does not have permissions to access the file.  To fix this problem, grant Domain Computers read permissions to the share, and NTFS read and execute permissions to the Client subfolder and all its child objects.  Grant the same permissions to the SCCM Network Access Account if the hotfixes are being deployed using a task sequence.


Share Permissions
NTFS Permissions

To propagate NTFS permissions to child objects, click on Advanced while in the Security tab, and then click on Change Permissions.


Next, enable the "Replace all child object permissions..." check-box and click on OK.


Client Upgrade Using SCCM Software Distribution


This method uses an SCCM package and program to run ccmsetup.exe and install the SCCM client.  Give permissions to Domain Computers to the Patch files as with the client Push method.  If you don't have an SCCM Client Upgrade package, you can create it from definition.  Then you can customize the command line of the SCCM program in this package to fit your needs.  Here you can add the PATCH property, separating the network paths to different Patch files with a semicolon.  However, the command line is limited to 255 characters, and specifying two hotfixes could easily exceed this limit.  


Other than placing the Patch files to another share with a shorter path, you can instead put the command in a batch file.  In a batch file, you can use the %~dp0 variable to indicate the current path where the program is running (the variable includes the backslash after the path).  This is illustrated below.


Then copy the batch file to the package source location (look at the package properties). This is normally the Client subfolder on the SCCM site server installation directory.


Next, modify the command line of the SCCM program to contain just the name of the batch file.


Then, update the distribution point(s) where the package is assigned and verify that it replicates successfully.


When the target client receives and runs the advertised program, you can look at the ccmsetup.log on the client to verify that the PATCH property is expanded correctly.  In this case, I configured the advertisement so the content of the package is downloaded before execution.  This is why the expanded variable contains the client cache folder.


You can also look at the client.msi.log to verify that the PATCH property is passed correctly.


Finally validate that the installation completed successfully from the log.


Installing an SCCM 2012 RC1 Primary Site

$
0
0
In this post I go through the steps of a basic installation of a Primary Site in System Center Configuration Manager 2012 (SCCM 2012) using a local SQL server instance.  As always, good planning should be done for your hierarchy before installing any SCCM site.  

If you are familiar with SCCM 2007, you can read the following post to assist you with your planning.


For technical details regarding the installation of SCCM sites in SCCM 2012 see


Prerequisites
  1. On the Windows Server 2008 (W2K8) system where you are going to install the primary site (W2K8 or greater version is required), install IIS and configure it with the components specified in this article, except WebDav.  
  2. Install the full version of .Net Framework 4
  3. Install Microsoft Report Viewer  
  4. Install WSUS (If W2K8 R2, Windows Server Update Services is available as a Role) indicating to create a WSUS web site as illustrated below (because it is being installed on the same system as the SCCM site server) and don't configure it at the end of the installation (just close the WSUS config wizard)
  5. Join your server to the domain if it isn't.
  6. It is recommended that you extend the Active Directory Schema for SCCM.  If you have already extended it for SCCM 2007, there's no need to extend it for SCCM 2012.      If the schema needs to be extended, you can follow these instructions to do so.
  7. Create the System Management container in AD and grant the server's machine account full control to it and to all the descendant objects.
WSUS Install


Install SQL Server
  1. Install SQL Server 2008 SP2 with cumulative update 6 (64-bit).  This is the only version supported in SCCM 2012 RC1 per the release notes .
  2. During installation install the following instance features: Database Engine Services with SQL Server Replication, Analysis Services and Reporting Services (the last two are optional)
  3. During installation for "Account Provisioning" add any SQL administrators in the "Specify SQL Server administrators" section.  Make sure that you add the administrator who will install SCCM and the system account of the site server itself.  In the illustration  below I actually have a group in AD with my site servers.
  4. During installation configure the main service accounts to run as local system as illustrated below
  5. During installation, select the SQL_Latin1_General_CP1_CI_AS collation as illustrated below
  6. If you are installing the Reporting Services, select "Install, but do not configure the report server"
  7. Install SQL Server backup hotfix KB2603910
  8. Open up SQL ports in the Windows Firewall by running this script
  9. Limit the memory that SQL can use by right-clicking on your server in "Microsoft SQL Server Management Studio" and going to Properties.  Then click on "Memory" and enter your "Maximum server memory".  The illustration below sets the maximum to 512 MB.

SQL Administrators

SQL Collation

SQL Services

Limit Memory for SQL


Install SCCM

Before the installation, create an empty file called no_sms_on_drive.sms on the root of any drive that you don't want SCCM to use as a storage for packages.  Double-click splash.hta located on the root of the installation files and click on "Get the latest Configuration Manager updates".  You will be prompted to enter the path where to download the updates.


Once the updates have been downloaded click on Install to start the installation wizard.  To troubleshoot errors during the installation, you can review the ConfigMgrSetupWizard.log and ConfigMgrSetup.log files on the root drive C:.


For "Available Setup Options", select "Install a Configuration Manager primary site".  If you are installing a stand-alone primary site select "Use typical installation options for a stand-alone primary site".  In this example, I'm not selecting this option because my primary site will be a child site of a Central Administration Site.


In the "Updates Prerequisite Components" page enter the path where you downloaded the updates.


Make your Server and Client language selections.

For "Site and Installation Settings", enter your site code and name, as well as the installation folder.  If you want to manage the site from the server itself select "Install the Configuration Manager console" (otherwise, you'll have to manage the site remotely).


Select whether to join your primary site to an existing hierarchy or install it as a stand-alone site.


In the "Database Information" page, enter the FQDN of your SQL server name, the instance name (leave blank if using the Default instance), the database name (you can accept the default) and SQL Server Service Broker (SSB) TCP port used for replication between sites (you can accept the default port 4022).


For "Client Computer Communication Settings" select "Configure the communication method on each site system role".


In the "Site System Roles" wizard page enable the "Install a management point" and "Install a distribution point" options.


Resolve any errors in the installation prerequisite check.  For details on any warning or error you can look at the ConfigMgrPrereq.log file on the root of drive C:.

When setup has completed, you can view the ConfigMgrSetup.log file.


Determine if SCCM Client is Stopped on Remote Computers

$
0
0
System Center Configuration Manager (SCCM) is a powerful tool used to manage devices such as desktops.  However, it relies on the SCCM client agent to be installed and running on each managed system.  If for some reason you have systems on your network with the agent service stopped, you won't be able to manage them.

While working at a client's environment this week I had the need to identify systems with the SMS Agent Host service stopped.  I developed a PowerShell script that would query the status of the CcmExec service remotely on computers listed in a file.

The script reads the computer names (one computer per line) from a file called pcList.txt but you can change the name and include a full path if needed.

The script skips computers that are not accessible (i.e. offline) and logs them in a file.  In the script the file name is offLine.txt but you can change the name and include a full path if needed.

Output
The script records the status of the agent on a file called agentStatus.txt but you can change the name and include a full path if needed.  The file is comma-delimited where one line per computer is used in the following format: 
ComputerName,Status

As a comma-delimited file, you can open and import it in Excel for easy analysis.

Requirements

  • No firewall should be blocking inbound ICMP and RPC traffic on computers
  • You must run the script using an account that has administrative rights on computers


The script is listed  below but in case the copy and paste operations cause issues, you can download it from the Microsoft Gallery:

# ------------------------------------------------------------------------

# NAME: isAgentStopped.ps1
# AUTHOR: Romano Jerez, NETvNext
# DATE: 12/3/2011
#
# Description:
# Remotely queries computers for status of SMS Agent Host service (CcmExec).
# Queries are done on computers listed in a file pcList.txt (one per line).
# No firewall should be blocking inbound ICMP and RPC traffic on computers.
# You must run script using an account that has administrative rights on computers.
#
# Output:
# Computers not accessible (i.e. offline) are listed in file offLine.txt.
# Status of computers is recorded in agentStatus.txt.  File is comma-delimited
# where one line per computer is used in format "computerName,Status".
# ------------------------------------------------------------------------ 


$comp = get-content pcList.txt


$strFileResults = "agentStatus.txt"


$strOffLinePCs = "offLine.txt"


$skipped = @()


$comp | foreach {


  $Global:currentpc = $_


  if (Test-Connection $currentpc -Quiet -Count 1)
  {  
    $status = get-service -ComputerName $currentpc | where-object { $_.Name -eq "CcmExec"} | 
               ForEach-Object { $_.status}


    $strLine = $currentpc + "," + $status
  
    $strLine | Out-File $strFileResults -append


    Write-Host $currentpc","$status
    
  }
  else
  {
    $skipped += $currentpc
  }

}


$skipped | Out-File $strOffLinePCs

Installing a Self-service Application Web Portal in SCCM 2012

$
0
0
One of the coolest features in System Center Configuration Manager (SCCM) 2012 is the built-in application web portal, where users can browse from any supported device to use or install software or applications that have been made available to them.  In this post I illustrate how to install the Application Catalog self-service website.

There are two site system roles that need to be installed in order to have your application web portal.  They are the Application Catalog web service point and the Application Catalog website point.  I've listed them in the order in which they must be installed.


The Application Catalog web service point provides information about available software from the Software Library to the Application Catalog website.
Software Library
Application Catalog website


The Application Catalog website point provides users with a list of available software.  


Both site system roles must be installed on the same site but not necessarily on the same site system server or in the same Active Directory (AD) forest.  There's a requirement that the Application Catalog web service should be in the same AD forest as the site database.  Also both roles can only be installed on a Primary Site but not on the Central Administration Site or a Secondary Site.  

IIS must be installed on the server prior to installing any of these roles.  For general information on installing a site server and IIS see 


IIS must be configured the following way for each role according to this Microsoft article.

IIS for Application Catalog web service point

Application Development:

  • ASP.NET (and automatically selected options)
IIS 6 Management Compatibility
  • IIS 6 Metabase Compatibility
Security:
  • Windows Authentication

IIS for Application Catalog website point

Common HTTP Features:

  • Static Content
  • Default Document
Application Development:
  • ASP.NET (and automatically selected options)
Security:
  • Windows Authentication
IIS 6 Management Compatibility:
  • IIS 6 Metabase Compatibility

To start the installation of these roles, just right-click on Servers and Site System Roles under Administration >> Site Configuration and select the appropriate role.


When configuring the roles, you indicate if you want to use HTTP or HTTPS connectivity.  If you want to use HTTPS, you must first deploy a web server certificate to the site system servers.  If you need to allow Internet clients to access the application catalog, you also need to deploy a web server certificate to the management point configured to support Internet clients.  When supporting Internet clients, Microsoft recommends that you install the Application Catalog website in a perimeter network, and the Application Catalog web service point on the intranet.  For more information about certificates see

These are the settings that you configure when installing the Application Catalog Web Service Point.
Application Catalog Web Service Point Settings

These are the settings that you configure when installing the Application Catalog Website Point.  Note that the Web application name will be part of the URL used by clients to access the catalog.  I used the default name here (CMApplicationCatalog), and it is part of the URL on the Application Catalog website illustration on the third screenshot of this post.
Application Catalog Website Point Settings


Also, as part of the Application Catalog Website Point settings you get to pick a Website theme, which is basically a color to be used on the web portal that the users access.  I selected green, and this is the color you see on the Application Catalog website illustration on the third screenshot of this post.
Application Catalog Website Theme


Testing your Application Catalog using a browser
If you used the default Web application name for the Application Catalog website point, browse to the following URL from a client:
http://<yourServerName>/CMApplicationCatalog

Verify that you see three tabs: Application Catalog, My Application Requests, and My Devices as illustrated on the third screenshot in this post.  The client machine requires Microsoft Silverlight to access the Application Catalog, which is installed when the SCCM client is installed.  If you want to access the catalog from a system that does not have the SCCM client, then install Microsoft Silverlight on it.


Testing your Application Catalog  using Software Center
Software Center is a new local SCCM client program that replaced Run Advertised Programs present in previous versions of the product.  End users can use it to manage software installed by SCCM on their devices.  To access your Application Catalog using Software Center, the user clicks on 
All Programs >> Microsoft System Center 2012 >> Configuration Manager >> Software Center
Starting Software Center

Again, verify that you see three tabs: Application Catalog, My Application Requests, and My Devices.


If your Client Systems have ActiveX Filtering Enabled

For your clients to use the Application Catalog using Internet Explorer, an ActiveX control must be allowed to run.  This ActiveX control is called ClientBridgeControl and is installed together with the SCCM client.

You can view the ActiveX control when you manage add-ons in Internet Explorer.  The illustration below shows that this specific ActiveX control is approved to run on my Application Catalog website.

You can efficiently configure Internet Explorer settings on many systems using the Internet Explorer Administration Kit (IEAK) or Group Policy.   One way to allow the ActiveX control is to add it to the Add-on List group policy setting (this works together with the setting Deny all add-ons unless specifically allowed in the Add-on List).  To add it to the list, right-click on it, click on Edit, select Enabled and click on Show next to Add-on List.  For Value name enter the CLSID of the ActiveX control, including the brackets,  {265DF7FB-C5D2-480C-BB81-C6614049B063}.  For Value enter 1 (enter 2 if you want the end-user to be able to enable or disable the add-on using Add-on Manager).


Troubleshooting your Application Catalog
If your test is not successful, check the status messages for the following components
  • SMS_PORTALWEB_CONTROL_MANAGER
  • SMS_AWEBSVC_CONTROL_MANAGER
You can also check the following logs
  • SMSAWEBSVCSetup.log
  • SMSPORTALWEBSetup.log
  • awebsvcMSI.log
  • portlwebMSI.log


For step-by-step instructions on how to deploy an application using the Application Catalog see


Deploy an App Using the Web Portal in SCCM 2012

$
0
0
System Center Configuration Manager (SCCM) 2012 allows you to publish your applications to a Web Portal so users can browse to it and select the applications they need --and are authorized to install.  In this post I describe how to publish an application to the Web portal (formally called Application Catalog Website) and how the user installs the application.  If you don't yet have a Web portal, you can follow these instructions to set it up:


SCCM 2012 Application Concepts

Application
An application is intelligent software that knows if a user is authorized to use it on a particular device, if that device can run it and how it should be made available to the user on that device.  An application in SCCM 2012 is what a package and program(s) is in SCCM 2007.  You can still use the old package-program in SCCM 2012 to deploy software but you won't take advantage of the intelligence in Applications.

Deployment
A deployment in SCCM 2012 is what an advertisement is in SCCM 2007.  A deployment is used to deploy an application.  You can indicate the purpose of a deployment as Required and Available.  Think of Required as the purpose of a mandatory assignment in an SCCM 2007 advertisement.  Think of Available as the purpose of an optional advertisement in SCCM 2007.  You can configure two actions for a deployment: Install and Uninstall.

Deployment Type
A Deployment Type is part of an Application and provides information needed to install the software.  It contains rules to determine if and how software should be installed on a particular device or delivered to a user.  SCCM 2012 has the following deployment types: Windows Installer, Script Installer, Microsoft Application Virtualization, Windows Mobile Cabinet and Nokia SIS file.

Application Catalog
This is a user-friendly web portal for applications that are not forced on devices by making the purpose of a deployment Available and configuring the deployment to target users.  Users can browse to the portal and install or use applications that are available to them (with the option to require approval for specific applications).

Software Center
This is an SCCM client application that replaces the "Run Advertised Programs" control panel applet present in the SCCM 2007 client.  If a deployment targets a device instead of a user, the user can install the application by launching Software Center.

User-Centric Application Management
This is a framework of SCCM features and other technologies that allow the intelligent delivery of applications to users anywhere on any device and at any time.  One example of this is making Microsoft Word available to a user.  Per the administrator's intent, Word will be installed only on the user's primary device, and it will be streamed to the user via App-V on any other device.

User Device Affinity
This is one of the key features in SCCM 2012 that makes User-Centric Application Management possible.  It allows a device to be configured as the primary device for a user.  You can actually have multiple primary users for a device, and multiple primary devices for a user.  For more information on this see


Creating an Application

In this example, we'll be deploying Microsoft Office Communicator 2007 R2.  To create an application for it, go to the Software Library node in the SCCM console.  Then right-click on Applications and select Create Application.


Next, specify the settings for the application.  Because there's an MSI provided for the installation of Office Communicator, I select "Windows Installer (Native)".  I also specify where the installation files are.


When you click on Next, application information will be imported from the MSI file.  Clicking on Next again displays the wizard page where you can enter information for the application.  The following information was automatically populated.


Click on Next to confirm the settings for the application and create it.  The application is now listed under Applications.


Note that one deployment type was created by default.  You can view it by clicking on the Deployment Types tab at the bottom of the Applications window.


You can look at the settings of the deployment type by right-clicking on it and selecting Properties.


There are many settings for a Deployment Type.  Here are the Programs settings for our deployment type.


Because I want to perform the MSI installation only on a user's primary device, I added a requirement for this.


For more information on creating deployment types, see the the following Microsoft article.


I then right-clicked on the Application and selected Properties so I could customize a little how the application would appear in the Application Catalog.  For example, I created a "Tools" category for it.  I also entered keywords that users could use to find the application in the catalog.


Deploying an Application

In this example, we'll deploy Office Communicator 2007 R2.  Right-click on the application and select Deploy.


In the first couple pages of the wizard, specify general information for the deployment such as the target collection (I targeted All Users) and the content destination (the distribution points that the software should be pushed to).  

On the "Specify settings to control how this software is deployed" page, select Install for Action (the other option is Uninstall), and select Available for Purpose (the other option is Required).  I also enabled "Require administrator approval if users request this application" because I want users to be authorized before they install the application.


On the next page of the wizard, I configure the user experience for the installation of the application by picking one of the User notifications options.


On the next wizard page you can configure Configuration Manager and Operations Manager alert options.


Confirm the wizard settings and finish creating the deployment.  You can look at the deployment by clicking on the Deployments tab on the Applications node while having our Application selected.


Allowing users to set their Primary Device

I want users to be able to set their primary device(s) themselves.  They do this by browsing to the Application Catalog and selecting My Devices.  However, by default, they don't have the rights to do that.  In the illustration below, the check-box to set the computer that the user is using to browse the catalog as the user's primary device is greyed-out.  


So I created a custom Client User Settings to give this right to the users that I want.  To do this, right-click on Client Settings under Administration and select Create Custom Client User Settings.


In the General page give your user settings a name and select User and Device Affinity.  I called it "Lab User Settings".


In the User and Device Affinity page set Allow user to define their primary devices to True.


Now you can see your new user settings under Client Settings.  To assign it to the appropriate users, right-click on it and select Deploy.


Then select the user collection that contains the appropriate users.


Note that when you assign the custom client settings, they overwrite the default client settings. Now the user is able to set her primary device when browsing the Application Catalog.


Installing an Application from the Application Catalog

When the user browses to the Application Catalog, the Application Catalog tab will list applications that are available to the user.  Because I configured my deployment to have the user request approval before installing the application, the user sees a REQUEST button instead of an INSTALL button.

So the user clicks on REQUEST, enters a reason for the application request and clicks on SUBMIT.


The user gets an acknowledgment about the submission.


The user can click on My Application Requests to see the status of the request.  Here, the status is Requested.


The administrator can approve --or deny-- the request by going to Approval Requests under Software Library >> Application Management, right-clicking on the request and selecting Approve.


The status in the console changes from Requested to Approved.


On the next policy refresh cycle on the user's computer, the user will see a notification indicating that the requested application has been approved.


The user now sees a status of Approved in the My Application Requests tab of the Application Catalog.


And when the user clicks on the Application Catalog tab, there is now an INSTALL button.


The user can now click on INSTALL to install the Application.


See this Microsoft article for a comparison of the Application Catalog vs Software Center.

Using the Client Push Installation Wizard in SCCM 2012

$
0
0
One way to install the System Center Configuration Manager (SCCM) 2012 client is to use the Client Push Installation Wizard.  The wizard conveniently allows you to initiate the client push installation when you want to and to a specific resource or all resources in a collection.  You can also use the automatic site-wide push installation but you don't have much control as the site server will push the client to any discovered resource.  In this post, I describe how to use the Client Push Installation Wizard.

For the SCCM server to be able to push the client to a resource, it must be able to access the ADMIN$ share on that resource (this is an administrative share).  For this to work, the Windows firewall on the target resource and any other firewall between the site server and the target computer must allow this traffic. On the target computer, create an exception in the Windows Firewall for the following traffic coming from the site server: File and Printer Sharing and Windows Management Instrumentation (WMI).  For more information see


Once the firewalls have been configured so the site server can access the ADMIN$ share on target systems, the site server must be able to resolve the target computer name to an IP address (and of course the target system must be online).  The site server must also use a user account that has local administrative rights on the target system when attempting to install the client.  You can indicate what account to use.  If you don't specify an account, the site server will attempt to use its computer account.  To specify a client push installation account, right-click on your site, select Client Installation Settings and click on Client Push Installation


In the Accounts tab of the Client Push Installation Properties window, enter the Client Push Installation account(s) you want to use in the following format: <domain>\<userAccount>.


In the Installation Properties tab, enter the client.msi properties appropriate for your client deployment (not the ccmsetup.exe properties).  For more information on these properties, see


This is an example of properties:


Boundaries and Boundary Groups

You should have the target system(s) network location in a boundary that is a member of a boundary group.  In SCCM 2012, each boundary must be a member of a boundary group for a resource that belongs to that boundary to be automatically assigned to a site.  Boundary Groups are new to SCCM 2012; they provide a way for clients to be automatically assigned to a site and a way for clients to locate content.  For more information see


Even if you are not using automatic site assignment, the Client Push Installation Wizard complains if a target system's network location is not included in a boundary group, indicating that the client won't be installed on it because it is not assigned to any site.

Creating boundaries and boundary groups is easy.  You just right-click on the appropriate node and select Create Boundary or Create Boundary Group.  Here's an example of a boundary:


and here's an example of a boundary group:


In the properties of a boundary group you can add the appropriate boundaries in the General tab:


In the References tab of the properties of a boundary group you can indicate that you want to use it for site assignment (and indicate which primary site), as well as indicate the distribution point(s) and state migration point(s) --if any-- associated with it so clients can locate content.


Configuring Client Settings

You may want to configure client settings before deploying the SCCM client if you don't want to use default settings.  The client settings are configured under Administration >> Client Settings.  You can modify the default settings and you can also create custom settings.  In the illustration below I have created custom client device settings and custom client user settings.  You then assign the custom settings to the appropriate resources.


  For more information on configuring client settings see


Running the Install Configuration Manager Client Wizard

You can launch the Client Push Installation Wizard by either right-clicking on a resource system and selecting Install Client to install it on one specific device


or you can launch it by right-clicking on a collection and selecting Install Client to install it on all devices members of that collection


The wizard presents to you the following installation options, with an explanation of each:

  • Allow the client software to be installed on domain controllers
  • Always install the client software
  • Install the client software from a specified site


When a client is successfully installed on a target system, it will log event 11707 in the Application log.


When for some reason the client push to a client fails, the site server will attempt the installation every hour for up to 7 days.


Script to Assign Packages to an SCCM Distribution Point

$
0
0

This VB script assigns packages listed in a text file (one per line) to an SCCM distribution point. The text file should contain the package IDs (without an extension). Run the script on the SCCM site server.

Before running the script configure three variables at the beginning of the script:

sourceFile - this is the full path to the text file containing the package IDs.
strSiteCode - This is the three-character SCCM site code.
strServerName - This is the computer name of the distribution point.

Run the script from a command prompt running with elevated administrative privileges using the following syntax:
cscript assignPKGsInFileToDP.vbs  
The script is listed below but in case paste and copy operations break it, you can download it from the Microsoft gallery.


' Author: Romano Jerez, NETvNext.com

' Purpose: Assign PKGs listed in a file (Package IDs without extensions)
' to an SCCM distribution point

' To be executed on site server

' OK to use and distribute as long as Author information is kept.


' *** SET THESE VARIABLES ***

sourceFile = "e:\scripts\packages.txt"

' these variables represent the target DP:

strSiteCode = "ST1"
strServerName = "sccmcentral"


' ********************************

Const ForReading = 1


' Connect to SCCM Provider on local machine

set objSwbemLocator = CreateObject("WbemScripting.SWbemLocator")
set objSWbemServices= objSWbemLocator.ConnectServer(".", "root\sms")
Set ProviderLoc = objSWbemServices.InstancesOf("SMS_ProviderLocation")


For Each Location In ProviderLoc
If Location.ProviderForLocalSite = True Then
Set objSWbemServices = objSWbemLocator.ConnectServer(Location.Machine, "root\sms\site_" + Location.SiteCode)
End If
Next


Set objShell = WScript.CreateObject("WScript.Shell")
Set objFSO = CreateObject("Scripting.FileSystemObject")

Set objFile1 = objFSO.OpenTextFile(sourceFile, ForReading)


Do Until (objFile1.AtEndOfStream)

package = objFile1.Readline

SWDAssignPackageToDistributionPoint objSWbemservices, package, strSiteCode, strServerName

Loop


objFile1.Close


' From SDK

Sub SWDAssignPackageToDistributionPoint(connection, existingPackageID, siteCode, serverName)

' Create distribution point object (this is not an actual distribution point).
Set distributionPoint = connection.Get("SMS_DistributionPoint").SpawnInstance_

' Associate the existing package with the new distribution point object.
distributionPoint.PackageID = existingPackageID

' This query selects a single distribution point based on the provided SiteCode and ServerName.
query = "SELECT * FROM SMS_SystemResourceList WHERE NALPath NOT LIKE '%PXE%' AND RoleName='SMS Distribution Point' AND SiteCode='" & siteCode & "' AND ServerName='" & serverName & "'"

Set listOfResources = connection.ExecQuery(query, , wbemFlagForwardOnly Or wbemFlagReturnImmediately)

' The query returns a collection that needs to be enumerated (although we should only get one instance back).
For Each resource In ListOfResources
distributionPoint.ServerNALPath = Resource.NALPath
distributionPoint.SiteCode = Resource.SiteCode
Next

' Save the distribution point instance for the package.
distributionPoint.Put_

' Display notification text.
Wscript.Echo "Assigned package: " & distributionPoint.PackageID

End Sub

Ensuring Desktop Admins can't Touch Servers in SCCM 2012

$
0
0
This article is based on a beta version of SCCM 2012 (RC2).  Sometimes organizations require that desktop administrators are technically isolated from servers to eliminate any human error coming from desktop admins affecting servers.  It is not uncommon for an organization to deploy a complex System Center Configuration Manager 2007 (SCCM 2007) hierarchy to attempt to  meet this requirement (if both desktops and servers are being managed by the same SCCM hierarchy).  Some organizations have even deployed two separate SCCM hierarchies in the same Active Directory forest (one to manage desktops and one to manage servers) for this purpose (this can cause issues with objects from both hierarchies published in the same Active Directory forest).  Fortunately, SCCM 2012 makes this requirement easier to satisfy with Role-Based Administration.

With Role-Based Administration in SCCM 2012, security roles, security scopes and assigned collections dictate the objects that an SCCM administrator can access and view in the SCCM console ("Show Me" behavior).  Any configuration setting related to Role-Based Administration is applied to each site in the hierarchy as sites are no longer administrative boundaries.  In this example I use Role-Based Administration to isolate a desktop administrator from servers by limiting them to manage only workstations.


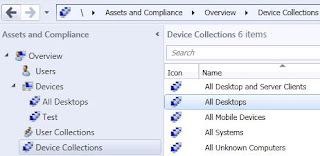
Create a Desktops-only Collection

Create a device collection that contains only desktops.  One way to accomplish this is to create a collection based on a query rule.  You can use the following WMI Query Language (WQL) query:

select SMS_R_SYSTEM.ResourceID,SMS_R_SYSTEM.ResourceType,SMS_R_SYSTEM.Name,SMS_R_SYSTEM.SMSUniqueIdentifier,SMS_R_SYSTEM.ResourceDomainORWorkgroup,SMS_R_SYSTEM.Client from SMS_R_System inner join SMS_G_System_SYSTEM on SMS_G_System_SYSTEM.ResourceId = SMS_R_System.ResourceId where SMS_G_System_SYSTEM.SystemRole = "Workstation"

In this example I called my collection All Desktops


Create a Security Scope

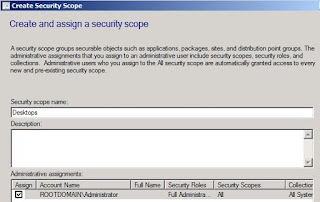
To create a security scope right-click on Security Scopes and click on Create Security Scope.


In this example I call the Security scope Desktops.  Note that the administrator that installed the SCCM site is automatically populated under Administrative assignments because she's assigned to the All security scope.


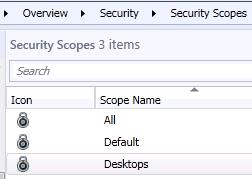
Now my scope is listed under Security Scopes.


Associate the Security Scope with the appropriate objects

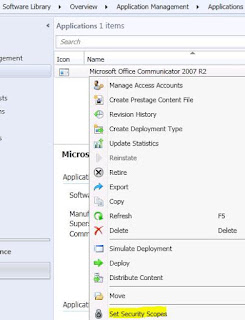
The association of a security scope with an object is done from the object and not from the security scope.  Here, I associate an application that I want the desktop administrators to manage by right-clicking on the application and clicking on Set Security Scopes:


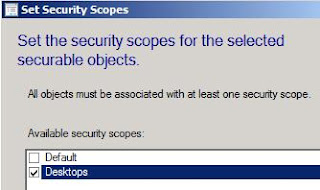
In the Set Security Scopes window, I select my Desktops security scope:


You can associate a distribution point or distribution point group with a security scope:


You can even associate a site to a security scope:


Create an administrative user

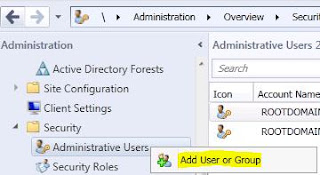
We now want to add your desktop administrator(s) to SCCM by right-clicking on Administrative Users and clicking on Add User or Group:


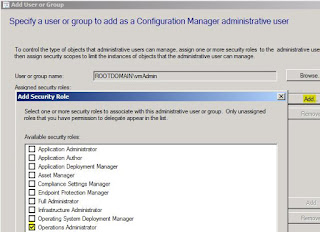
In the Add User or Group window, click on Browse to pick the User or group name from Active Directory (if you pick a group it should have as members desktop administrators).  In this example I picked the vmAdmin user, and for Assigned security roles I selected Operations Administrator.


At the bottom of the Add User or Group window, under Assigned security scopes and collections, I used the Add button to add my All Desktops collection

and then used the same Add button to add my Desktops security cope (at least one security scope must be assigned)


Now when my desktop administrator vmAdmin logs in to the SCCM console, he will have access only to the objects allowed by the Operations Administrator role, the Desktop security scope and the All Desktops collection.

Asset Tag in SCCM Database

$
0
0
This post describes one way to get the Asset Tag information of computer systems into the System Center Configuration Manager (SCCM) database.  The described method is useful when the Asset Tag is not present in the BIOS, WMI, the registry or any location in a system that could be inventoried via a custom MOF modification.

The approach consists in using a system attribute in Active Directory (AD) to store the asset tag, and then add the attribute to the SCCM AD System discovery to get it into the SCCM database.  If you have the asset tag information in a database or spreadsheet (including the computer name) you can script adding the asset tag to the AD attribute.

In this example I'm using the Description attribute from AD to hold the asset tag information, but you can use any AD attribute not being used by your organization.  To illustrate, I've manually added asset tag information to the Description field in the AD computer properties of a system.
Add the Description attribute to the AD system discovery (extended Active Directory object attribute).
The next time the AD system discovery runs, any discovered computer system will contain the Description field.  Here I'm looking at the properties of an SCCM client in a collection.
This information can be pulled from the new Description field in the v_R_System view.  Here I create a custom report to obtain the asset tag and free space on fixed hard disks (in MB).
Clicking on "Edit SQL Statement" to get a better view of the SQL query.  Note that you have to add a zero to Description.
And this is the output of the report.
Using this approach it is possible to get any data outside of SCCM (not just the Asset Tag information) into the SCCM database.

OSD - Automate Domain OU Name from Computer Name

$
0
0
While working on an engagement to automate the deployment of Windows 7 using System Center Configuration Manager (SCCM) 2007 with Microsoft Deployment Toolkit (MDT) 2010 integration, my client requested to have the systems join the appropriate Active Directory (AD) domain Organizational Unit (OU) based on the computer name.  This post describes how I accomplished this Operating System Deployment (OSD) request.  This is one way of doing it.

The requirement was for bare-metal deployments using unknown systems. After PXE booting a bare-metal system, the deployment technician selects the appropriate task sequence and then gets prompted for the computer name.  One easy way to have the task sequence (TS) prompt for a computer name is to create an OSDComputerName variable in the collection that the advertisement of the TS is targeting, in this case the "All Unknown Computers" collection.  Leave the variable value empty.

My client had a naming convention for computer systems where the first two characters of a computer name indicated the OU that the system is a member of.  I wrote the following script that looks at the computer name stored in the OSDComputerName variable to determine the correct OU and then sets the OSDDomainOUName variable to the appropriate OU.

set env = CreateObject("Microsoft.SMS.TSEnvironment")
sComputerName = env("OSDComputerName")
twoChars = UCase(Left(sComputerName,2))
sBuiltOU = "NOT_set!"
     If twoChars = "AB" Then
        sBuiltOU = "LDAP://OU=AB,OU=Computers,DC=DOMAIN,DC=COM"
     If twoChars = "CD" Then
        sBuiltOU = "LDAP://OU=CD,OU=Computers,DC=DOMAIN,DC=COM"
     If twoChars = "EF" Then
        sBuiltOU = "LDAP://OU=EF,OU=Computers,DC=DOMAIN,DC=COM"
env("OSDDomainOUName") = sBuiltOU
Wscript.quit

The sBuiltOU custom variable holds the determined OU and then gets assigned to the OSDDomainOUName variable.  If the OU can't be determined from the first two characters, then the variable will be set to "NOT_set!". This is useful because you will see this value in the OSD logs and status messages, indicating that you don't have an "If" condition for the computer name's first two characters. 

I called the script setOUname.vbs.  To use it in the task sequence, you can put it into a new SCCM package or put it in the scripts sub-folder of your MDT Files package.  To find path to the MDT files package look at the properties of your package:
Then copy the script to the scripts sub-folder (make sure you update the distribution point afterwards):
When you use the MDT Toolkit Package in the TS, you can reference the scripts folder with the following variable: %ScriptRoot%.  Call the script in the PostInstall section of the TS after the "Apply Windows Settings" step and before the "Apply Network Settings" step using a "Run Command Line" step.  Note that we are using the MDT Toolkit Package so we can reference our script.  Leave the Domain OU field in the "Apply Network Settings" step blank.
These are the settings of the "Set OSDDomainOUName" step:
You can use the script as a template when in need to determine the OU based on the computer name.  You can easily adjust it to reflect the logic of your specific request.

Forcing Laptops to Use the SMP to Store User Data

$
0
0
While working on a Windows 7 Deployment project using System Center Configuration Manager (SCCM) 2007 integrated with the Microsoft Deployment Toolkit (MDT) 2010 Update 1, my client requested that only desktops should store user data and settings locally using USMT hardlinking, while laptops must store the user data on the SCCM State Migration Point (SMP).

The reason behind the request is that the laptops had the entire hard disk encrypted with a third-party encrypting technology, and the client didn't want to add decrypt an re-encrypt the disk during a Refresh Operating System Deployment (OSD) scenario. 

Because I was using the MDT-SCCM integration and USMT 4.0 for my task sequence, by default harlinking will always be used.  This is because when the "Determine Local or Remote User State" step runs, it will always set the USMTLOCAL variable to True due to the MDT-SCCM integration and USMT 4.0.

I needed to find a way for the USMTLOCAL variable not to be set to True for laptops.  I solved this problem by adding a condition to the "Determine Local or Remote User State" step so it would run only when the machine is a desktop.  The condition states that the step should run only if the IsDesktop variable is set to True.

Find to what DPs Packages are Assigned

$
0
0
If you are trying to maintain and keep track of your System Center Configuration Manager (SCCM) packages, you may have the need to determine to what Distribution Points (DP), if any, some packages are assigned.  If you have to find this information for many packages, it may prove to be a time consuming task using the SCCM console.  I've written this VB script to make this task easier and faster.

Before using the script, configure the following three variables at the beginning of it (the values provided in the script are for illustration purposes):
  1. SMSServer
  2. sourceFile
  3. outputFile
The SMSServer is the name of the site server where the packages were created.

The sourceFile is the name of a file containing a list of package IDs that you need to find the distribution points that they are assigned to.  This is a sample file:

The outputFile is the name of the file where the script will send the output data.  The output data consists of a line for each package-DP combination, where the package ID is listed first, followed by the DP (comma-delimited).  This is an example of the output file:
You can run the script from the command line using the following syntax:

cscript getAssignedDPs.vbs

The following illustrates running the script.  Note that if any of the packages is not assigned to any DP, it will let you know.

Because copying and pasting can break the script lines incorrectly, you can also download the script from the Microsoft Gallery.

Script

' by Romano Jerez
' March 2012
' http://www.netvnext.com

' Outputs assignedDPs for packages listed in a file

' SMSServer variable should be set to the site where packages were created

' OK to distribute and use keeping author information (first 3 lines)


' *** SET THESE VARIABLES ***

SMSServer = "SCCMcentral"

sourceFile = "e:\test\PKGs.txt"

outputFile = "e:\test\assignedDPs.csv"

' ***************************


Const ForReading = 1
Const ForWriting = 2

' Connect to SMS provider

set objSwbemLocator = CreateObject("WbemScripting.SWbemLocator")
set objCENSWbemServices= objSWbemLocator.ConnectServer(SMSServer, "root\sms")
Set ProviderLoc = objCENSWbemServices.InstancesOf("SMS_ProviderLocation")

For Each Location In ProviderLoc
      If Location.ProviderForLocalSite = True Then
          Set objCENSWbemServices = objSWbemLocator.ConnectServer(Location.Machine,"root\sms\site_" + 

Location.SiteCode)
      End If
      CENsiteCode = Location.SiteCode
Next

Set objShell = WScript.CreateObject("WScript.Shell")
Set objFSO = CreateObject("Scripting.FileSystemObject")
Set objFile1 = objFSO.OpenTextFile(sourceFile, ForReading) 
Set objOutFile = objFSO.CreateTextFile(outputFile)
objOutFile.Close
Set objOutFile = objFSO.OpenTextFile(outputFile, ForWriting)

Do Until (objFile1.AtEndOfStream)
   pkgID = objFile1.Readline
   getDPs objCENSWbemServices,pkgID
Loop

objFile1.Close
ObjOutFile.Close


' ----------------------------------------------------------

Sub getDPs(CENconnection, pkg)

   query = "SELECT ServerNALPath FROM SMS_PackageStatusDistPointsSummarizer WHERE PackageID='" & pkg & "'"    

   Set listOfResources = CENconnection.ExecQuery(query, , wbemFlagForwardOnly Or wbemFlagReturnImmediately)

    ' The query returns a collection that needs to be enumerated

   If listOfResources.Count > 0 Then

      For Each resource In ListOfResources      
          strServer = getServerFromNAL(resource.ServerNALPath)
          ObjOutFile.WriteLine(pkg & "," & strServer)
      Next
   Else
      WScript.Echo pkg & " is not assigned to any Distribution Point"
   End If

End Sub


' ---------------------------------------------------------

Function getServerFromNAL(strNAL)

   strArray1 = Split(strNAL,"]")

   strArray2 = Split(strArray1(0),"\")

   getServerFromNAL = strArray2(2)
End Function


Hardware Inventory for Windows 7 Migration

$
0
0
When performing a migration from Windows XP to Windows 7, it is critical, for planning purposes, to get hardware inventory of the existing systems to see if they could support Windows 7 (x32 or x64 bit) and BitLocker with a TPM chip.  Fortunately, if System Center Configuration Manager (SCCM) is managing the environment, the information that you need is already in the SCCM database.

You can use the SQL query below to create an SCCM report and obtain the following information by computer model:

  • CPU Name
  • CPU Platform (x32 or x64 bit)
  • CPU Speed (GHz)
  • RAM (GB)
  • TPM Chip present *
  • Disk size of volume C: (GB)
  • Free disk space on volume C: (GB)
* I put this query together for a client that had only HP laptops.  According to information from HP's web site, the XP systems that have a TPM chip would have a system device called "Infineon Trusted Platform Module".  So the report would report any device with a name containing "Trusted Platform" in the "TPM Chip" field.  If the field is blank, then that computer doesn't have this device.


SQL Query

SELECT Distinct SYS.Netbios_Name0, CS.Model0,CPU.Name0 AS [CPU Name], CASE  WHEN CPU.Is64Bit0 = 1 THEN 'Yes' ELSE 'No' END AS [CPU 64-Bit],ROUND(CONVERT(FLOAT,CPU.MaxClockSpeed0), -2)/1000 AS [CPU (GHz)],
ROUND(ROUND(CONVERT(FLOAT,MEM.TotalPhysicalMemory0) / 1048576, 2) , 1) AS [RAM (GB)],[TPM Chip]=(SELECT  v_GS_SYSTEM_DEVICES.Name0 FROM  v_GS_SYSTEM_DEVICES WHERE  v_GS_SYSTEM_DEVICES.ResourceID=SYS.ResourceID AND  v_GS_SYSTEM_DEVICES.Name0 LIKE '%Trusted Platform%') ,LDISK.DeviceID0,LDISK.Size0/1024 AS [Size (GB)],LDISK.FreeSpace0/1024 AS [Free Space (GB)] FROM v_R_System SYS LEFT JOIN v_GS_LOGICAL_DISK LDISK on SYS.ResourceID = LDISK.ResourceID LEFT JOIN v_GS_COMPUTER_SYSTEM CS on SYS.ResourceID = CS.ResourceID LEFT JOIN v_GS_X86_PC_MEMORY MEM on SYS.ResourceID = MEM.ResourceID LEFT JOIN v_GS_Processor CPU on SYS.ResourceID = CPU.ResourceID LEFT JOIN v_GS_SYSTEM_DEVICES DEV on SYS.ResourceID = DEV.ResourceID WHERE  LDISK.DeviceID0 = 'C:' AND CS.Model0 NOT LIKE '%VMWARE%'
AND CS.Model0 = @Model
ORDER BY SYS.Netbios_Name0

Note: I used the ROUND syntax from a Microsoft newsgroup post by dhconsulting (Thanks dhconsulting!).

The report excludes systems with a model name containing "VMWARE".  The has a report prompt (prompt name is Model), so you can select the computer model for which you want to obtain inventory data (also excludes any model containing "VMWARE" in its name).

SQL Prompt

SELECT Distinct Model0 FROM v_GS_COMPUTER_SYSTEM
WHERE Model0 NOT LIKE '%VMWARE%'


SQL Server 2012 and SCCM

$
0
0
Now that SQL 2012 has been released, it would be natural to want to host the System Center Configuration Manager (SCCM) database on the latest release of Microsoft SQL Server.  In this post I provide information regarding SCCM and SQL 2012.


SCCM 2007


Hosting the SCCM 2007 database on SQL 2012 is supported IF the following conditions are met:

  • You must have an SCCM 2007 SP2 or SCCM 2007 R3 site
  • You must upgrade the SQL instance hosting an SCCM 2007 database from SQL Server 2008 or SQL Server 2008 R2 to SQL Server 2012.
It is not supported to use SQL Server 2012 when installing a new SCCM site. 

You also should apply the following hotfixes:

For more information see the following Microsoft article:


As the article states, it may take a few months for the support of SQL 2012 to be reflected in the SCCM 2007 SP2 Supported Configurations page.


SCCM 2012

Unfortunately, Microsoft is not yet supporting SQL Server 2012 to host an SCCM 2012 site database.  It may work but you would be in an unsupported configuration.  So as for now, the versions of SQL Server 2008 and SQL Server 2008 R2 listed in the SCCM 2012 Supported Configuration page is what Microsoft supports.

Script to Delete Collections Listed in a File

$
0
0
This VB script may be useful if you are cleaning up your collections.  It deletes the collections listed in a text file.  The text file contains collection IDs, one per line.


Before running the script, configure the name of your SCCM server and the full path to the file at the beginning of the script.


Run the script from an elevated command prompt using the following syntax:


cscript delCollsInFile.vbs


In case the copy and paste operation breaks the lines of the script, you can download it from the Microsoft Gallery.


' by Romano Jerez


' Script deletes collections listed in text sourceFile (one collection ID per line)


' *** SET THESE VARIABLES ***


SMSServer = "mySCCMserver"


sourceFile = "c:\collectionsToDelete.txt"


' ***************************


Const ForReading = 1


' Connect to SMS provider


set objSwbemLocator = CreateObject("WbemScripting.SWbemLocator")
set objSWbemServices= objSWbemLocator.ConnectServer(SMSServer, "root\sms")
Set ProviderLoc = objSWbemServices.InstancesOf("SMS_ProviderLocation")


For Each Location In ProviderLoc
      If Location.ProviderForLocalSite = True Then
          Set objSWbemServices = objSWbemLocator.ConnectServer(Location.Machine, "root\sms\site_" + Location.SiteCode)
      End If
      siteCode = Location.SiteCode
Next


Set objShell = WScript.CreateObject("WScript.Shell")
Set objFSO = CreateObject("Scripting.FileSystemObject")
Set objFile1 = objFSO.OpenTextFile(sourceFile, ForReading) 


Do Until (objFile1.AtEndOfStream)
   collID = objFile1.Readline
   delCollection collID
Loop


objFile1.Close


Sub delCollection(coID)
    WScript.Echo "Deleting " & coID
    Set Col = objSWbemServices.Get("SMS_Collection.CollectionID='" & coID & "'")
    Col.Delete_
End Sub

Supported SQL Versions in SCCM 2012

$
0
0
The Central Administration site and site servers in System Center Configuration Manager 2012 (SCCM 2012) require a SQL database.

SCCM 2012 supports the following Microsoft SQL Server versions:

  • SQL Server 2008 SP2 with Cumulative Update 9
  • SQL Server 2008 SP3 with Cumulative Update 4
  • SQL Server 2008 R2 SP1 with Cumulative Update 6
The SQL versions above could be Standard, Enterprise or Datacenter editions.

For Secondary Sites only, the following SQL version could be used:
  • SQL Server Express 2008 R2 SP1 with Cumulative Update 4

Considerations

The Standard edition of SQL server supports up to 50,000 clients when running on the same system as the Central Administration site server or Primary site server.

If your hierarchy or site needs to support more than 50,000 clients then you have the following options:
  • If using SQL Server Standard edition, place your SCCM SQL database on a remote server (instead of running it on the site server) so it supports up to 100,000 clients, which is the maximum number of clients that a Primary site can support.  Ensure that you have a fast network to support the intense SQL traffic between the Primary site and the SQL server.
  • Use SQL Server Enteprise edition on the Central Administration site server so it supports up to 400,000 clients, which is the maximum number of clients supported for the entire hierarchy.


Update 1 for MDT 2012 and SCCM

$
0
0
Today at TechEd 2012 I had the opportunity to attend an all-day seminar about the Microsoft Deployment Toolkit 2012 (MDT 2012) presented by Michael Niehaus and Mikael Nystrom.  I wanted to share some nice features that Update 1 for MDT 2012 will provide to System Center Configuration Manager (SCCM).  The first beta of MDT 2012 Update 1 will be available soon, according to Niehaus.


Remote Control
Some of the remote control functions part of the new Monitoring feature of MDT 2012 will be available in SCCM via the MDT-SCCM integration.


Offline Migration
More settings will be migrated offline, similar to User-Driven Installation (UDI).


Orchestrator Runbook Step
A new task sequence step will allow to run an Orchestrator Runbook.  This will allow you to easily run complex tasks that many times can only be accomplished with scripts.
Orchestrator Runbook Task Sequence Step in MDT 2012 Update 1

Consumerization of IT, SCCM and Windows Intune

$
0
0
Today at TechEd 2012 I attended a session about enabling consumerization of IT. Consumerization of IT refers to how IT departments deal with the expectation of users to use their powerful devices (such as tables and mobile phones) to be more productive, and the requirements of the IT department to protect an organization from security threats that these devices may represent. For more information on this topic see Microsoft's viewpoint.
In the session, Garth Fort presented Microsoft technologies that allow IT departments to securely embrace these user devices to increase productivity instead of fighting them.


System Center Configuration Manager 2012 SP1

It was announced in this session that CTP beta of SP1 for SCCM 2012 will start next week.  SCCM 2012 SP1 will offer two new deployment types to deliver applications to Mac OS devices as well delivering Metro Style Apps to devices using Windows 8.  The new deployment types are

  1. Metro Style Apps
  2. Deployment for Mac OS X 
For an example on using SCCM 2012 deployment types to deliver applications to devices see 


Windows Intune

In the same session, it was announced that Windows Intune (the Microsoft cloud based management solution for Internet connected Windows systems) now allows enterprises to manage and deliver applications to mobile devices such as Windows Phone 7, Apple iPhones, iPads, and Android devices securely.

The new version of Windows Intune can offer secure single sign-on capabilities thanks to Windows Azure Active Directory, which is available on the cloud and can be integrated with an organization's on-premise Active Directory environment.  

Windows Intune can manage mobile devices thanks to the integration with the organization's Microsoft Exchange infrastructure using Exchange ActiveSync (EAS). 


Conclusion

Microsoft seems to have a new business strategy by providing tools to manage Apple and Android devices.  Windows Intune and System Center Configuration Manager both provide technologies to manage systems and mobile devices over the Internet.  I'm looking forward in future releases of both products for the integration of their respective databases.

Viewing all 63 articles
Browse latest View live