Quantcast
Channel: NETvNext Blog
Viewing all 63 articles
Browse latest View live

USMT Version Needed for your Operating System Deployment

$
0
0
The version of the User State Migration Tool (USMT) that you need to use to migrate user data and application settings for your Operating System Deployment (OSD) depends on your source and target operating system.

I obtained the information from the chart below from a TechEd 2012 session. It indicates whether you should use USMT 3, USMT 4 or USMT 5 when migrating from and to Windows XP, Windows Vista, Windows 7 and Windows 8.  The column on the left depicts the source OS, and the header indicates the target OS.
USMT 5.0 is part of the Windows Assessment and Deployment Kit (ADK) for Windows 8.  Note that the Microsoft Deployment Toolkit 2012 (MDT 2012) already supports deploying Windows 8 Consumer Preview.


Installing the MBAM Client During OSD

$
0
0
In a recent Windows XP to Windows 7 migration project, my client requested to use MBAM to manage Bitlocker.  I had to design the MBAM infrastructure as well as to provision the MBAM client during the Operating System Deployment (OSD) using System Center Configuration Manager (SCCM).

In this article I share information on how I engineered the task sequence work.  This is one way to accomplish this task.

Prerequisites for the MBAM Client Deployment

  • The MBAM server infrastructure must be in place
  • Before the MBAM infrastructure can manage MBAM clients, the MBAM group policy settings with the BitLocker encryption requirements must be assigned to the appropriate Active Directory (AD) Organizational Unit (OU).
  • The TPM chip on each client system to be encrypted must be visible to the OS, enabled and NOT owned.
  • An unencrypted bootable disk partition (300 MB minimum)

Configuring the TPM Chip

You can automate the configuration of the TPM chip in the BIOS if the computer manufacturer provides a utility to configure the BIOS.  Here are URLs to help you configure the BIOS for HP, Dell and Lenovo.

Task Sequence High-Level Steps

  1. Create the bitlocker partition
  2. Enable the TPM chip
  3. Install the MBAM agent
  4. Stop the MBAM agent
  5. Import the MBAM agent override registry keys
  6. Start the MBAM agent so encryption starts
  7. Remove most of the imported registry settings
For the above steps, I used information and the ZTIBDE.WSF script from the following Microsoft article: Using MBAM to Start BitLocker Encryption in a Task Sequence.  Next I provide additional information.

Task Sequence Details

Since the disk partition is not created in Refresh scenarios, I added a step to set the OSDisk task sequence variable to C: (it would always be C: in my case).
Setting OSDisk Variable

Note that i added the built-in Disable BitLocker step at the beginning of the Refresh Only group to account for systems that are already encrypted with bilocker.

The ZTIBDE script aborts if  the TPM chip is not active.  The script takes care of the partition in a Refresh scenario as it shrinks the disk to make space for the bitlocker partition before creating it.  A great feature of it is that if it finds that a bitlocker partition already exists, it doesn't attempt to shrink the disk or create the partition.  The script assigns a drive letter of S: to the partition it creates.


As you can see, I have a Enable BitLocker task sequence group at the end of the task sequence.  Because we are encrypting laptops only, I set a condition on the group so the steps in it execute only on laptops by using the IsLaptop variable.

The Set BIOS Password and Enable TPM steps use the BIOS configuration tool to set the BIOS password and configure it to enable the TPM chip.  I have two of these steps because some systems already had a BIOS password and one of the steps provides it.  As only one of the steps would work, I configured them to continue on error.

The Hide Drive S: step hides the S: drive created by the script by running a package that contains a text file called hide-S-volume.txt and runs the command diskpart.exe /s hide-S-volume.txt.  The contents of the file is just two lines:
select volume s:
remove letter=s

The Install MBAM Client step runs a program from an SCCM package that contains the MBAM client installation file (64-bit in my case).  The command line for the SCCM program is:
msiexec.exe /i MBAMClient-64bit.msi /q

The Eject CD-DVD step ejects the CD-DVD disk drive as encryption won't start if there is a disk in it.  This is a Run Command Line step that runs the following command:
Powershell ((New-Object -ComObject "WMPlayer.ocx").cdromCollection).Item(0).Eject()

The Start MBAM Encryption step runs the following program from an SCCM package:
cscript.exe StartMBAMEncryption.wsf /AddRegFile:AddMBAMRegEntries.reg /RemoveRegFile:RemoveMBAMRegEntries.reg


Results

The disk encryption will start at the end of the Windows 7 deployment.  If desired the client can wait until encryption finishes before delivering the laptop to the end user.  The client can also shutdown the system and give it to the user.  When the user starts the computer, encryption will resume (depending on system resources on the system, encryption activity may be invisible to the user).

Be patient, the MBAM client will wait up to 90 minutes before communicating with the MBAM server unless you enable the NoStartupDelay registry value in the registry at HKLM\Software\Microsoft\MBAM.

Move Computer to OU during OSD

$
0
0
A few months ago I wrote a blog post about how to dynamically compute the Organizational Unit (OU) where a computer should be placed when joining an Active Directory domain during an Operating System Deployment (OSD).  However, as I discovered in my last project (SCCM 2012 integrated with MDT 2012), if the computer being deployed with an OS already exists in Active Directory, it won't be moved to the computed OU.  

In this post I describe how to move an existing computer account to a dynamically computed OU during OSD using Maik Koster's web service. At the start of the deployment (Windows 7 in my case), the computer account will be moved to a staging OU where no GPOs are linked to ensure that no policy settings interfere during the duration of the OS deployment.  At the end of the deployment, the computer will be moved to the computed final OU. 

First, download, install and test the functionality of the web service.  The following link provides the download location, the installation guide and instructions to test its functionality: Maik Koster's web service.

We'll use one of the MoveComputer scripts (Z_MoveComputer_SwapOUValues.wsf) and the ZTI_ExecuteWebservice.wsf script from Maik.  Copy these files to the Scripts subfolder of your MDT package and update the distribution points (DPs).  You can wait to update the DPs as we'll modify the Z_MoveComputer_SwapOUValues.wsf script which will force us to update them again.

Configuring the CustomSettings.ini file

Add a [MoveComputerToOU] section to your CustomSettings.ini file as provided in Maik's example.  Make sure that you adjust the WebService value to reflect the URL for your web service.  Basically, the task sequence will use the ZTI_ExecuteWebservice.wsf script to call the web service's MoveComputerToOU method.  The task sequence will pass two parameters: OSDComputerName and MachineObjectOU.  We'll have to make sure that the value on these task sequence variables are set correctly before we place the call to the web service.

Moving the computer to the staging OU

Add the following steps after the "Apply Network Settings" step:


The Set OU Variable is a "Set Task Sequence Variable" step that will configure the MachineObjectOU task sequence variable to the value of your staging OU.


The Move Computer to Staging OU step is a "Run Command Line" step that will call the MoveComputerToOU web service method.  The value of the OSDComputerName variable will have been automatically configured by the Gather step in the task sequence.  Note that you have to configure in the step the package that has your CustomSettings.ini file.


Moving the computer to the final computed OU

At the end of the task sequence we'll move the computer to its final destination OU.  If you have just one OU where you need to move the computer accounts then you can repeat the same steps for moving it to the staging OU (you would set the MachineObjectOU to the appropriate value though).  However, if you need to compute the OU from the computer name, then you need to run your script (whatever VB script you have to compute the OU) to generate the OU and assign it to the MachineObjectOU variable.

You should convert your VB script to .WSF format.  What I did for my client was to use the Z_MoveComputer_SwapOUValues.wsf script as a template and added my existing VB script as a function to it.  To do this, add the following lines after the "End Function" statement that ends the Main function:

Function GenOU

End Function

Then add your VB script code in between these two statements.  Make sure that you declare all your variables in a Dim statement.  Just before the end of your function, you have to assign the computed OU value to the function name (i.e: GenOU = "OU=myOU,DC=myDomain,DC=com").  Then, in the Main function, comment out the statements related to StagingOU and add the following statement in between the two commented out statements:

oEnvironment.item("MachineObjectOU") = GenOU


Ensure that you update the distribution points for your MDT package after making changes to your script (which should reside in the Scripts subfolder).

The three steps at the end of the task sequence would be


The Initialize OU Variable step will make sure that the MachineObjectOU task sequence variable is available for us to set its value.  You can leave its value blank.


The Compute OU from Computer Name step runs your modified script.


The Move Computer to Final OU step:


Troubleshooting

Fortunately, there's a log for each script and for the web service activities.  The scripts' logs will be in the same location where your latest smsts.log file is.  The log file names are Z_MoveComputer_SwapOUValues.log and ZTI_ExecuteWebService.log.

The web service logs will be in the logs subfolder of the web service virtual directory.  There are three files, all with a Date prefix: Debug.log, Info.log and Trace.log.


Roles in SCCM OSD without using a Database

$
0
0
You may have the need to set different configuration settings based on a role for the computer where Windows is being installed.  For example, a computer for someone in the human resources department may need different settings than a computer for someone in the accounting department.  Using roles is easy if you integrate MDT with SCCM and use a database in MDT (see my post from last year).  However, I recently had the need to use roles without using a database.  In this post, I describe how to compute the appropriate role based on the computer name by using a UserExit script.

This Microsoft blog post from Ben Hunter has a good explanation on what a UserExit script is and how it works.  I'm also going to use Johan's example and adapt it for my solution.  This solution was implemented for Windows 7 deployments using SCCM 2012 integrated with MDT 2012 (without an MDT database). The problem at hand is that I needed to specify different settings in CustomSettings.ini for computers depending on that computer's role (or the role for the user of that computer).  Fortunately, the role could be obtained based on the computer name (the client named computers based on a naming convention).

UserExit Script

The script has a getRole function that takes the computer name and returns the role (Store or Corporate).  I named the script UserExit.vbs and copied it to the Scripts subfolder of the MDT package created in SCCM (make sure that you update the distribution points).  You can adjust the script as needed based on your naming convention and roles.


Function UserExit(sType, sWhen, sDetail, bSkip)

    oLogging.CreateEntry "USEREXIT:UserExit.vbs started: " & sType & " " & sWhen & " " & sDetail, LogTypeInfo

    UserExit = Success

End Function


Function getRole(sComputerName)

' Takes the computer name as an argument 
' Returns computer role (Corporate or Store) based on computer name
' If computer name starts with "S" role is Store
' If computer name starts with anything else role is Corporate

   sFirstLetter = UCase(Left(sComputerName,1))
   
   Select Case sFirstLetter

        Case "S"
           getRole = "Store"

        Case Else
           getRole = "Corporate"        

   End Select
   
End Function


CustomSettings.ini

In the Settings section I add a priority called Role.


[Settings]
Priority=Default,Role
Properties=MyCustomProperty,StagingOU


I added the following lines to the Default section.  Note that I reference the name of the script, and that the getRole function is called passing the computer name via the HostName variable.

[Default]

UserExit=UserExit.vbs
Role1=#getRole("%HostName%")#

At the end of the file I add a section for each of the roles, defining the appropriate settings.  Note that I use the DoNotCreateExtraPartition setting to better illustrate how you can have different settings based on the role.


[Store]
OSDMigrateMode=Advanced
OSDMigrateAdditionalCaptureOptions=/ue:\*.* /v:5
OSDMigrateConfigFiles=Miguser.xml,Migapp.xml
DoNotCreateExtraPartition=YES

[Corporate]
DoNotCreateExtraPartition=NO


SCCM OSD: Use DaRT to Remotely Access Windows PE

$
0
0
You can use the Microsoft Diagnostic and Recovery Toolset (DaRT) 7 to establish a remote connection to a system where Windows 7 is being deployed with System Center Configuration Manager (SCCM) 2012 while in Windows PE.  This is extremely helpful if you are deploying an operating system to a target system in a remote location where there is no IT staff and you or a technician need to troubleshoot an issue in Windows PE.  In this post I provide information on setting this up.

Adding DaRT Files to Boot Image

The first step to accomplish this is to add the necessary DaRT files to your boot image.  On a recent project, I used MDT 2012 to capture my reference image and create the boot image.  It was easy to have MDT add the DaRT files to the image by following Michael Niehaus' instructions.  

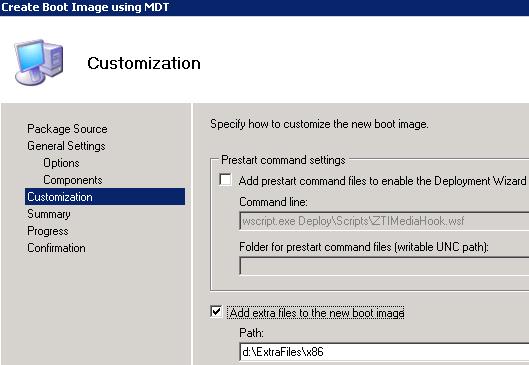
If you are using SCCM to create your boot image, you can add the files specified in step 2 of this Johan's post using the "Add extra files" feature.  Here I'm using this feature in my MDT-integrated create boot image wizard.  In this case I added the files to d:\ExtraFiles\x86\Windows\System32 but pay attention that in the path I just specify d:\ExtraFiles\x86.


Run RemoteRecovery on Target System


On the target system, run RemoteRecovery.exe while in Windows PE.  You can use a "Run Command Line" step as illustrated below.


This will enable the system to accept incoming remote connections and show a window with the ticket number, IP address and Port that needs to be provided to the remote technician that wants to connect to this system.  

Run DaRT Remote Connection Viewer on Technician Computer

The technician runs DaRT Remote Connection Viewer and enters the ticket number, IP address and port used by the target system in Windows PE.

This runs DartRemoteViewer.exe


However, if nobody is at the location where the target system is, how can the technician find this information?  Fortunately, Nico Sienaert has shared a script that can automatically make this information available to the technician.  I made a few changes to the script as in my case it was reporting the incorrect port number (script at the end of this post).  

I configured the script to report the necessary information to a .cmd file which gets copied to a centralized share.  The technician just needs to double-click on the .cmd file to establish a remote session to the target system.  Notice that I have the script (called autoDaRT.vbs), MSDartCmn.dll and Interop.RDPCOMAPILib.dll in my share so a technician can run the script from a remote system without having DaRT installed (check your Microsoft license agreement before copying the DLL files to the share).


The .cmd files in the share have been automatically created by target systems while in Windows PE.  These are the contents of one of these files (I have obscured the name of the server):


Run Script in Task Sequence

I added the script to an SCCM package and run it in my task sequence.


AutoDaRT VB Script (modify what's hi-lighted)


'==================================================================== 


' NAME: Automate Remote Monitoring (DaRT) 

' AUTHOR: Nico Sienaert, 
' DATE  : 20/09/2011 

' Modified by Romano Jerez on 8/29/2012
'
'=====================================================================

'Map network drive

Set objNetwork = CreateObject("WScript.Network") 
strDriveLetter = "M:"
strHomeServer = "\\serverName\DaRT_Remote$
strusername = "yourDomain\userName
strPassword = "password
strprofile = "false" 
objNetwork.MapNetworkDrive strDriveLetter, strHomeServer, strprofile, strUsername, strPassword

Set oFSO = CreateObject("Scripting.FileSystemObject") 
sFile = "X:\sms\bin\i386\inv32.xml" 
If oFSO.FileExists(sFile) Then  
        Set oFile = oFSO.OpenTextFile(sFile, 1)   
        Do While Not oFile.AtEndOfStream    
        sText = oFile.ReadLine     
                If Trim(sText) <> "" Then      
                
                'Find Session ID 
                
                strfindID = InStr(sText, "ID=") 
                
                strfindID1 = strfindID + 4 
                
                strtofindID = Mid(sText,strfindID1,11) 
            
                
                'Find Port 
                
                strfindPort = InStr(sText, "P=") 
                
                strfindPort1 = strfindPort + 3 
                
                strtofindPort = Mid(sText,strfindPort1,5) 

                strtofindPort = strtofindPort + 1
                
                
                'Find IP Address 
                
                strcomputer = "." 
                Set objWMIService = GetObject("winmgmts:" _ 
                & "{impersonationLevel=impersonate}!\\" & strComputer & "\root\cimv2") 
                Set colItems = objWMIService.ExecQuery _  
                ("Select * From Win32_NetworkAdapterConfiguration Where IPEnabled = True")   
                strCount = 1 
                
                            For Each objitem in colItems 
                              If strCount = 1 Then 
                                     
                                  stripaddress = objitem.IPAddress(0) 


                                    'Create Batch File 
                                    
                                    
                                    Set objFSO = CreateObject("Scripting.FileSystemObject") 
                                    
                                    'Open write stream 
                                    Set outFile = objFSO.CreateTextFile("M:\"& strtofindid &".cmd", True) 
                                    
                                    'Write each command line 
                                    
                                    outFile.WriteLine "\\serverName\DaRT_Remote$\DartRemoteViewer.exe" & " " & "-ticket=" & strtofindid & " " & "-IPaddress=" & stripaddress & " " & "-port=" & strtofindport 
                                    
                                    'Close write stream 
                                    outFile.Close 
                            
                            
                              Else    
                            
                             End If 
  
                            Next 
   

                End If   

        Loop  

    oFile.Close 

Else  

WScript.Echo "inv32.xml not found" 

End If


Windows Intune and SCCM Start Merging

$
0
0
About three months ago I wrote about Consumerization of IT, SCCM and Windows Intune.  As mobile devices continue to proliferate, users will demand to use their own personal devices in the work environment following the Bring Your Own Device (BYOD) concept.  Having such a diverse type of devices, such as Windows Phone, iPad, iPhone, and Android-based, presents a real challenge for IT departments on many organizations.

Microsoft has helped IT administrators by making it easier to manage devices on-premises using System Center Configuration Manager 2012 (SCCM 2012), and by managing devices not-on-premises but connected to the Internet (or to the Cloud for a more appropriate term nowadays) using Windows Intune.

I concluded my first blog post on this topic by stating that I was looking forward Microsoft integrating the databases of SCCM and Windows Intune so IT administrators didn't have to look at data in two places to analyze their overall management data and report on it.  I'm happy to report that the next version of Windows Intune, in addition of supporting Windows RT devices and Windows Phone 8, will support the management of its devices using the SCCM 2012 SP1 console (as an alternative to using the Windows Intune cloud-based console).  SP1 for SCCM 2012 will allow this interoperability (SP1 is currently in beta).

Although this is only a start, the interoperability of SCCM and Windows Intune will allow administrators to continue using Windows Intune as the "fully in the cloud" solution to manage PCs and mobile devices (SCCM also has features to manage Internet-based devices) while beginning to be able to manage on-premises and on-the-cloud devices (and view reports) from one console.


SCCM, Windows Deployments and UE-V

$
0
0
In many Windows deployment projects that I've worked on, customizing USMT to migrate just the right user data and application settings for refresh scenarios can add a considerable amount of time to the deployment engineering process.  USMT allows the user data, Windows and application settings to be migrated when a user computer is wiped before installing a new Windows operating system on it.

When an organization has implemented user state virtualization technologies such as roaming user profiles or folder redirection, the engineering time to migrate user data and application settings in Windows deployments tends to decrease because there's no need to migrate some user data or user application settings.  However, in several projects the client has not implemented roaming profiles, pointing to limitations or issues with it as a reason.

Fortunately, Microsoft will be releasing User Experience Virtualization (UE-V) as part of the Microsoft Desktop Optimization Pack (MDOP).  UE-V is able to keep user application settings synchronized across locations and Windows devices regardless on the method in which the application is delivered or if it is in a virtual desktop session.  UE-V offers more granularity and flexibility than roaming user profiles, which will make it more likely for organizations to implement it.

UE-V may decrease the cost of Windows deployment projects by reducing the USMT engineering time. This video provides a good overview of UE-V.  In addition, System Center Configuration Manager (SCCM) can deploy the UE-V agent as part of software distribution or during Windows 7 or Windows 8 deployments.  There's also a UE-V Desired Configuration Management (DCM) pack that can be used with SCCM to ensure a consistent UE-V agent configuration.

Automating Windows Deployments With No DHCP

$
0
0
Last week I had the need to automate the deployment of Windows 7 using System Center Configuration Manager (SCCM) 2012 in a Refresh scenario on systems where DHCP wasn't available.  These systems used static IP addresses.  SCCM was integrated with the Microsoft Deployment Toolkit (MDT) 2012.

In a bare-metal scenario, the task sequence wizard gives you the option of entering the static IP configuration while in Windows PE.


But how do we configure the static IP settings in Windows PE in a Refresh scenario?  In a Refresh scenario, you initiate the deployment from the existing running operating system on the target computer, and the Task Sequence wizard is not present by default.  One way is to use built-in variables.  We can set the values for these variables for each system that needs static IP addressing.  Although you can use CustomSettings.ini to have these variables configured for each system's MAC address, I populated the variables in a text file (csv format) and imported it into SCCM because I had too many systems to have a section for in CustomSettings.ini.  The variables that I used are

  • OSDAdapter0MacAddress
  • OSDAdapter0IPAddressList
  • OSDAdapter0SubnetMask
  • OSDAdapter0Gateways
  • OSDAdapter0DNSServerList
  • OSDAdapter0EnableWINS
  • OSDAdapter0WINSServerList
  • OSDAdapter0TCPIPNetBiosOptions
  • OSDAdapterCount (make sure you use this one)
Most of these variables are self-explanatory but you can get more information on this Microsoft article: 

This automation method is also useful for the deployment of server operating systems (normally servers do not obtain IP addresses from DHCP).

I populated the values for the variables in a .csv file, one line per system.  Each variable and variable data is delimited by a comma (comma-delimited file).  Here's a file displaying some values for just one computer.


The first line on this file has headers.  The first two fields, COMPUTER NAME and MAC ADDRESS are used to identify the system being imported and are not variables.  The rest of the fields are the names of the actual variables.  Although I could have used any good descriptive name, I used the name of the variables so it would make it easier to go through the import process (more on this ahead).  

The second line in the file is the first computer to be imported.  The first field, myPCname maps to the COMPUTER NAME header, the second field with a MAC address maps to the MAC ADDRESS header, and so on.  You may ask yourself why I repeat the MAC address.  I do it because the second field is used by SCCM to identify the computer being imported, and the third field is used to populate the OSDAdapter0MacAddress variable.  This file can contain records for all the systems that you want to have in SCCM set with the appropriate variable values.  If a system already exists in SCCM, the import process will have the effect of adding or overwriting the variables to it.


Importing Process

To initiate the import of the systems with their variable values into SCCM, click on Import Computer Information after selecting Devices in the Assets and Compliance section of the console.


This starts the Import Computer Information Wizard.  Next select the Import computers using a file option.


Next you choose your mappings.  Because I have a header row in my file, I enable the "This file has column headings" option.  The Source Column shows my header names, the "Sample Data" shows the actual values for the first computer, and the "Assign As" column is used to map your data values correctly.  Below you can see the first row shows my computer name correctly mapped to "Name", which is a field used by SCCM in the import process.  However, the MAC ADDRESS field is incorrectly mapped to SMBIOS GUID.  


I need to assign the data on the second row to "MAC Address", which is also used by SCCM in the import process to identify the computer.  However, because the third row is already using the "MAC Address" assignment, I need to correct that one first before correcting the second row.

Below I correct the third row by selecting Variable for "Assign as" and then I enter the variable name.  This is why I decided to use the actual variables as headers because I can just copy from the "Column" field and paste it into the "Variable Name" field.


Now I can correct the mapping on the second row:


Here you can see some of the variables already assigned.


When you are done with the mappings, click on Next.  You will then be able to choose to what collection you want to add the records.

After the import process has completed, you can review the properties of an imported computer:


In my case, I needed to have two DNS servers and two WINS servers configured for each system.  However, these two variables (OSDAdapter0DNSSeverList and OSDAdapter0WINSServerList) require that multiple IP addresses are separated by a comma.  Because our import file is also comma-delimited, I couldn't list more than one IP address for these variables.  As a result, I had to manually enter the second IP address after the import process.

Next I describe how to add a second IP address to the OSDAdapter0DNSServerList variable for one record.  You can repeat this process for the OSDAdapter0WINSServerList variable.

Select the OSDAdapter0DNSServerList variable and click the Edit button.


Add a comma followed by the second DNS server:


This is how the value for the OSDAdapter0DNSServerList variable looks now:


Now, I can initiate the deployment of Windows 7 on the imported system (myPCname) usign the Refresh scenario, and Windows PE will automatically configure TCP/IP on the systems' network interface by reading the values assigned to the variables.


Use SCCM To Remove Users From Local Administrators Group

$
0
0
This week I worked on a request by a client to use System Center Configuration Manager (SCCM) to remove unauthorized user accounts from the local Administrators group on computers being managed by SCCM.  The client had reasons for not wanting to accomplish this using Restricted Groups in Active Directory or Group Policy Preferences as explained by Alan Burchill here.

The solution required that any user account not a member of an Active Directory group be removed from the local Administrators group except two local user accounts: Administrator and Admin2.

I put together a VB script that would accomplish this: RemoveLocalAdmins.vbs.  The script has been successfully tested on Windows XP and Windows 7.  It removes user accounts (not groups) from the local Administrators group except:

  • Users that are members of a specified Active Directory group (the script ignores nested groups that this group might have)
  • Two specific local users
To run the script using SCCM, add the script to a package and create a program that runs the following command: 

cscript.exe RemoveLocalAdmins.vbs

Before running the script, specify your own Active Directory group that contains members that will be exempted from removal.  Do this in line 5 by specifying the LDAP path of your group replacing the following:

LDAP://CN=ADGroup-LocalAdmins,OU=SecurityGroups,DC=NETvNext,DC=COM

The script exempts two local user accounts from being removed.  You can indicate your own local accounts by replacing "Administrator" in line 26 and "Admin2" in line 30.

I'm listing the contents of the script below but just in case the copy and paste operation cause problems, you can download it from Microsoft Gallery.

' Author: Romano Jerez, http://www.netvnext.com
' November 2012


strADgroup = "LDAP://CN=ADGroup-LocalAdmins,OU=SecurityGroups,DC=NETvNext,DC=COM"
Set objADGroup = GetObject(strADgroup)

strComputer = "."
Set objLocalGroup = GetObject("WinNT://" & strComputer & "/Administrators")


For Each objLocalMember In objLocalGroup.Members

   If objLocalMember.Class = "User" Then
      
       bAuthorized = 0

       For Each objADMember in objADGroup.Members
          If objADMember.Class = "user" Then
             If objADMember.samAccountName = objLocalMember.Name Then
                bAuthorized = 1
             End If
          End If
       Next

       If objLocalMember.Name = "Administrator" Then
          bAuthorized = 1
       End If

       If objLocalMember.Name = "Admin2" Then
          bAuthorized = 1
       End If

       If bAuthorized = 0 Then
          WScript.Echo "Removing " & objLocalMember.Name
          objLocalGroup.Remove(objLocalMember.AdsPath)
       End If
   End If

Next


Set objADGroup = Nothing
Set objLocalGroup = Nothing


Validate Hardware during Windows Deployment

$
0
0
Before System Center Configuration Manager (SCCM) deploys an operating system to a computer system, it can validate that it has the appropriate hardware according to your requirements.  

In the task sequence (TS), there's a Validate step in the Preinstall >> New Computer Only group.

In this example, when the TS targets a system for deployment, it will do it only if the system has the configured minimum memory and processor speed.

If the system does not meet your configured requirements, the task sequence will abort before making any change to the system.  For example, if the system does not have sufficient memory, it will log the following.

bdd.log

ERROR - 997MB of memory is insufficient.  At least 2048MB of memory is required.
Unable to create WebService class

FAILURE ( 9804 ): ERROR - 997MB of memory is insufficient.  At least 2048MB of memory is required.

smsts.log
This log will include the above messages plus

Failed to run the action: Validate. 
Unknown error (Error: 0000264C; Source: Unknown)


SCCM OSD: Automating Device Manager Functions

$
0
0
(Lifetime Pageviews to my blog reached one million this month.  Thank you for your support!)

In a recent Windows XP to Windows 7 deployment project, it was requested that bluetooth functionality be disabled on laptops during their migration to Windows 7.  It was easy to automate in a task sequence disabling the bluetooth service and the bluetooth network adapter.  However, even after doing this, the bluetooth icon was still showing in the system tray, indicating that some bluetooth functionality was still enabled.  I was able to completely disable bluetooth by also disabling the bluetooth device in device manager.  Then I needed to find a way to automate this without using device manager.

I found a command-line tool called devcon.exe, which is part of the Windows Driver Kit.  I put the following commands in a batch file to completely disable bluetooth:

REM by Romano Jerez

REM disables Bluetooth Support Service and the Bluetooth Device Network Adapter

sc config bthserv start= disabled > c:\windows\temp\logs\disableBlueTooth.log 2>&1
wmic path win32_networkadapter where name="Bluetooth Device (Personal Area Network)" call disable >> c:\windows\temp\logs\disableBlueTooth.log 2>&1

REM disables Thinkpad Bluetooth 3.0 device
devcon.exe disable usb\vid_0A5C* >> c:\windows\temp\logs\disableBlueTooth.log 2>&1

Next, I configured the batch file to run in a "Run Command Line" step in the task sequence after the drivers are installed.  The lines may be broken up incorrectly with the copy and paste operation.  There are two lines (two commands) to disable the bluetooth support service and the bluetooth device network adapter; one starts with "sc config", and the other one with "wmic".  There's one line (one command) to disable the bluetooth device in device manager, which starts with "devcon.exe".  

Each command logs to a file called disableBlueTooth.log in the c:\windows\temp folder.  The "2>&1" at the end of each line is needed so errors are also logged.

As you cann see, to disable the device I had to pass the hardware ID to devcon.exe.  You can use the hdids parameter of devcon.exe to find the hardware ID for your device.  For details on how to do this see DevCon Examples.

If you want to run the batch file only on laptops, use the IsLaptop variable. In this blog post I provide details on how to do use it.


Rename PCs During SCCM OSD ZTI

$
0
0
Recently I had to develop a solution to automate renaming computers when refreshing the operating system on them using System Center Configuration Manager (SCCM) 2012 SP1.  The rename needed to occur at the start of the refresh so most of the steps later in the task sequence occur with the system having the new name.  The client knew what new name each machine should have.  In this post I share the solution I came up with.  This Zero-Touch Installation (ZTI) solution renames domain-joined computers, and the rename also occurs in Active Directory (AD).

Description of Solution

A computer refresh during Operating System Deployment (OSD) starts when a Task Sequence (TS) is processed on a system's existing Operating System (OS).  This solution renames the computer while the existing OS is running by executing the rename script in the "State Capture" group of the TS.
A text file was created to indicate the new name for systems to be renamed (renameList.txt).  Each line contains the old (existing) and the new name of a system, in that order, separated by a comma:

oldName,newName

This file is then placed on a share that is accessed by the target computer during deployment of the new OS.

To monitor the OS deployment and the rename operation on a large number of systems, the script creates a local log on the target system and centralized logs on a share.  On a network share, three subfolders need to be created before hand: Success, Fail and NoRenameAttempt (the script allows you to use different names).  A target computer will create a log named after its existing name (<existingName>.txt) in one of these folders.  The log will contain information regarding the rename operation.  When the rename succeeds, the log is created in the Success folder.  When the rename fails, it is created in the Fail folder.  When the rename operation is not attempted, the log is created in the NoRenameAttempt folder. 

The rename operation is not attempted in these cases:

  1. The existing name is not found on the left of the comma in any of the lines of the file containing the old and new computer names.
  2. The new computer name is greater than 15 characters.
  3. The old name and the new name are the same in the file containing the old and new computer names.
A domain user account is used to rename the computer.  This account must have the rights to rename computer objects in AD and perform a domain join operation, to read the rename list file on a network share, and to create and write the log files on the configured network share.  Check this article about delegating domain join control to a user account.

Implementing Solution

To implement the solution, configure the rename list, the log locations, and the domain join account at the beginning of the VB script (in red).  Next, place the script in an SCCM package and distribute it to the appropriate distribution point(s).  Then, add a "Run Command Line" step in your task sequence where you want the rename to occur.  This step will execute the VB script.  Below are the details of the TS step.
In the task sequence step details, you can see that I put the script in a file called renamePC-v3.vbs, I put the file in a package called renamePC-v3, and I indicated that the domain join user account is used to run the step (replace <domainName> with your domain name, and <domainAccount> with your domain join user account).

Script

(In the event that the copy and paste operation breaks the lines of the script, you can also download it from the Microsoft Gallery).

' February 2013
' by Romano Jerez
'
' OK to use and distribute if author information is kept
' ===========================================================

Option Explicit

Dim strPCList, objFSO, objWshNet, strLocalPC, objPCFile, strCurrentLine
Dim arrayName, strOldName, strNewName, intExitCode, objComputer 
Dim objWMIService, Return, bFound, strLocalLogFile, objLocalLogFile
Dim strUserAccount, strUserPassword, strRemoteLogFileSuccess
Dim strRemoteLogFileFail, strRemoteLogFileNoRename, objRemoteLogFileSuccess
Dim objRemoteLogFileFail, objRemoteLogFileNoRename, bSameName
Dim strRemoteLogFileSuccessShare, strRemoteLogFileFailShare
Dim strRemoteLogFileNoRenameShare


Const ForReading = 1
Const ForWriting = 2
Const ForAppending = 8


' *** Configure file with computer list ***

  strPCList = "\\<serverName>\<shareName>\renameList.txt"

' *****************************************


' *** Configure local log File and remote log locations ***
'
  strLocalLogFile = "c:\windows\temp\pcRename.log"
  strRemoteLogFileSuccessShare = "\\<serverName>\<shareName>\Success"
  strRemoteLogFileFailShare = "\\<serverName>\<shareName>\Fail"
  strRemoteLogFileNoRenameShare = "\\<serverName>\<shareName>\NoRenameAttempt"
'
' ********************************

' *** Configure Account with permissions to rename computer in AD ***
'
  strUserAccount = "<domainName>\<domainAccount>"
  strUserPassword = "<password>"
'
' ********************************

Set objWshNet = CreateObject("WScript.Network")
Set objFSO = CreateObject("Scripting.FileSystemObject")

strLocalPC = objWshNet.ComputerName

strRemoteLogFileSuccess = strRemoteLogFileSuccessShare & "\" & strLocalPC & ".txt"
strRemoteLogFileFail = strRemoteLogFileFailShare & "\" & strLocalPC & ".txt"
strRemoteLogFileNoRename = strRemoteLogFileNoRenameShare & "\" & strLocalPC & ".txt"

initializeLogging


Set objPCFile = objFSO.OpenTextFile(strPCList, ForReading)

intExitCode = 99

bSameName = vbFalse
bFound = vbFalse 

Do Until (objPCFile.AtEndOfStream)
  strCurrentLine = objPCFile.Readline

  If Len(strCurrentLine) > 0 Then
    arrayName = Split(strCurrentLine, ",", -1, 1)
    strOldName = Trim(arrayName(0))
    strNewName = Trim(arrayName(1))

    If strLocalPC = strOldName Then
      bFound = vbTrue
      If (Len(strNewName)) > 15 Then
        WScript.Echo "Not renaming as new name has more than 15 characters: " & strNewName
        writeToLog("Not renaming as new name has more than 15 characters: " & strNewName)
        LogNoRename("Not renaming as new name has more than 15 characters: " & strNewName)       
      ElseIf strOldName = strNewName Then
        bSameName = vbTrue
        WScript.Echo "Not renaming as old and New name are the same for " & strLocalPC
        writeToLog("Not renaming as old and New name are the same for " & strLocalPC)
        LogNoRename("Not renaming as old and New name are the same for " & strLocalPC)
      Else
        WScript.Echo "Old name: " & strOldName & ".  Changing to " & strNewName
        writeToLog("Old name: " & strOldName & ".  Changing to " & strNewName)
        intExitCode = Rename(strNewName)
      End If
    End If
  End If
Loop


If Not bFound Then
  WScript.Echo strLocalPC & " not found in list as old computer. No renaming attempted."
  writeToLog(strLocalPC & " not found in list as old computer.  No renaming attempted.")
  LogNoRename(strLocalPC & " not found in list as old computer.  No renaming attempted.")
End If


If intExitCode = 99 Then  ' didn't run Rename function
  intExitCode = 0         ' but return that the script ran successfully
End If

cleanUp


WScript.Quit(intExitCode)


' *********************************************************************

Sub cleanUp

  WScript.Echo "Exit code: " & intExitCode
  writeToLoG("Exit code: " & intExitCode)
  objPCFile.Close
  objLocalLogFile.Close

End Sub

' *****************

Sub initializeLogging

  If objFSO.FileExists(strLocalLogFile) Then
    Set objLocalLogFile = objFSO.OpenTextFile(strLocalLogFile, ForAppending)
  Else
    Set objLocalLogFile = objFSO.CreateTextFile(strLocalLogFile)
    objLocalLogFile.Close
    Set objLocalLogFile = objFSO.OpenTextFile(strLocalLogFile, ForWriting)
  End If

  objLocalLogFile.WriteLine(Now())

End Sub

' *****************

Sub LogNoRename(strMessage)

  If objFSO.FileExists(strRemoteLogFileNoRename) Then
    Set objRemoteLogFileNoRename = objFSO.OpenTextFile(strRemoteLogFileNoRename, ForAppending)
  Else
    Set objRemoteLogFileNoRename = objFSO.CreateTextFile(strRemoteLogFileNoRename)
    objRemoteLogFileNoRename.Close
    Set objRemoteLogFileNoRename = objFSO.OpenTextFile(strRemoteLogFileNoRename, ForWriting)
  End If

  objRemoteLogFileNoRename.WriteLine(Now())
  objRemoteLogFileNoRename.WriteLine(strMessage)
  objRemoteLogFileNoRename.Close

End Sub

' ******************

Sub LogRenameFailed(strMessage)

  If objFSO.FileExists(strRemoteLogFileFail) Then
    WScript.Echo "File exists"
    Set objRemoteLogFileFail = objFSO.OpenTextFile(strRemoteLogFileFail, ForAppending)
  Else
    Set objRemoteLogFileFail = objFSO.CreateTextFile(strRemoteLogFileFail)
    objRemoteLogFileFail.Close
    Set objRemoteLogFileFail = objFSO.OpenTextFile(strRemoteLogFileFail, ForWriting)
  End If

  objRemoteLogFileFail.WriteLine(Now())
  objRemoteLogFileFail.WriteLine(strMessage)
  objRemoteLogFileFail.Close

End Sub

' ******************

Sub LogRenameSucceded(strMessage)

  If objFSO.FileExists(strRemoteLogFileSuccess) Then
    Set objRemoteLogFileSuccess = objFSO.OpenTextFile(strRemoteLogFileSuccess, ForAppending)
  Else
    Set objRemoteLogFileSuccess = objFSO.CreateTextFile(strRemoteLogFileSuccess)
    objRemoteLogFileSuccess.Close
    Set objRemoteLogFileSuccess = objFSO.OpenTextFile(strRemoteLogFileSuccess, ForWriting)
  End If

  objRemoteLogFileSuccess.WriteLine(Now())
  objRemoteLogFileSuccess.WriteLine(strMessage)
  objRemoteLogFileSuccess.Close

End Sub

' ****************************************

Function Rename(strName)
  Set objWMIService = GetObject("Winmgmts:root\cimv2") 
  For Each objComputer in objWMIService.InstancesOf("Win32_ComputerSystem")
    Return = objComputer.Rename(strName,strUserPassword,strUserAccount)
    
    If Return <> 0 Then
      WScript.Echo "Rename to " & strName & " failed. Error = " & Err.Number
      writeToLog("Rename to " & strName & " failed. Error = " & Err.Number)
      LogRenameFailed("Rename to " & strName & " failed. Error = " & Err.Number & vbCrLf & "Exit code: " & Return)
    Else
      WScript.Echo "Rename to " & strName & " succeeded. Restart is needed."
      writeToLog("Rename to " & strName & " succeeded. Restart is needed.")
      LogRenameSucceded("Rename to " & strName & " succeeded. Restart is needed.")
    End If
  
  Next

  Rename = Return
End Function


' ***************************************

Sub writeToLog(strMessage)

  objLocalLogFile.WriteLine(strMessage)

End Sub

' ***************************************

Check for TPM Before Enabling Bitlocker during OSD

$
0
0
While working on a project deploying Windows 7 SP1 using System Center Configuration Manager (SCCM) 2012 SP1, we had the need to ensure early in the task sequence (TS) that if the target system was a laptop, the TPM chip was enabled.  We were enabling Bitlocker close to the end of the task sequence and didn't want to waste time getting the OS and applications installed and then later find out that Bitlocker couldn't be enabled because the TPM chip wasn't or it wasn't present.

We were not enabling Bitlocker on desktops so we created a TS group with our deployment TS steps to be processed only if the target system was a desktop or it was a laptop with the TPM chip enabled.  A second group was created that would be processed only if the target system was a laptop with the TPM chip disabled, in which case the TS would exit.  These conditions were placed early in the TS as to not to perform unnecessary tasks if the system was a laptop with the TPM chip disabled.  Here is an oversimplified example.

Here are the conditions for the first TS group:
Querying Win32_TPM in MicrosoftTPM WMI class

Here are the conditions for the second group:

(note that the "IsLaptop equals TRUE" step could be moved up by removing the second "If All the conditions are true" but this is a good way to illustrate nesting conditions).


The step that I run when the TPM is found to be disabled is a simple script that I put in the Scripts folder of the MDT package.  I have the script report a failure exit code so the task sequence stops (as long as you don't have the step configured to continue on failure).  The error code reported is 0xBEE in hex. This is a random chosen error that I thought would be easy to identify after the insect that stings you (when you don't have the TPM chip enabled). The error is logged in the BDD.LOG and in a file called ZTImessage.log.

Contents of ZTImessage.wsf


<job id="ZTImessage">
   <script language="VBScript" src="ZTIUtility.vbs"/>
   <script language="VBScript">

Option Explicit
RunNewInstance

'//------------------------------------------------------
'//  Global Constants
'//------------------------------------------------------

'//------------------------------------------------------
'//  Main Class
'//------------------------------------------------------

Class ZTImessage

   '//--------------------------------------------------------
   '//  Global constant and variable declarations
   '//--------------------------------------------------------

   Dim iRetVal

   '//--------------------------------------------------------
   '//  Constructor to initialize needed global objects
   '//--------------------------------------------------------
   Private Sub Class_Initialize
   End Sub
   '//--------------------------------------------------------
   '//  Main routine
   '//--------------------------------------------------------
   Function Main
       On Error Resume Next
       'Insert your custom code here
       oLogging.CreateEntry "TPM is disabled! Aborting...", LogTypeError
       iRetVal = 3054
       Main = iRetVal
   End Function
End Class
   </script>
</job>

MBAM 2.0 and SCCM

$
0
0
This morning at MMS 2013 I attended a session on What's New with Windows 8 BitLocker and MBAM 2.0.  At the end of the session the speaker was happy  to announce that MBAM 2.0 had just been released.  I'm excited about the new integration of MBAM with System Center Configuration Manager.

The integration allows the following:

  • Compliance Database and Reporting integrated to ConfigMgr (software inventory is extended so SCCM client reports the data)
  • Hardware compatibility and targeting using SCCM collectiions

Last year I blogged about installing the MBAM client during operating system deployment (OSD), and explained how BitLocker was enabled at the end of the task sequence.  Although this is not an MBAM 2.0 new feature, deploying Windows 8 allows for BitLocker to be pre-provisioned so it is enabled before the operating system is deployed while in Windows PE 4.0.  If the option to Encrypt Used Disk Space Only is used, the step to enable BitLocker can be set to occur at the start of the task sequence because it would only take a few seconds.  BitLocker will be in a Waiting For Activation state but when the MBAM agent is installed it will activate it with the appropriate key protector.

OSD - Pause BitLocker and Resume After Deployment

$
0
0
In a recent project migrating Windows XP to Windows 7 using System Center Configuration Manager 2012 (ConfigMgr) integrated with the Microsoft Deployment Toolkit 2012 Update 1 (MDT), BitLocker encryption was started at the end of the Task Sequence (TS).  Right after the deployment of Windows 7, applications were installed on the systems using ConfigMgr's software distribution.  However, the installation of the applications took a few hours longer than normal due to disk encryption taking place at the same time.

I put together a solution where the following takes place:

  • Pause BitLocker encryption (if disk is encrypting) at the end of the TS
  • While still in the TS, create a Windows Scheduled Task that will resume encryption X hours/minutes after the TS ends
This is the order of the relevant steps:
  1. BitLocker is enabled and disk encryption starts close to the end of the TS
  2. Validate the disk is being encrypted and if so, pause encryption
  3. Create a Windows Scheduled Task that will resume BitLocker X hours/days after the TS ends
In this solution, ConfigMgr software distribution is used to install applications during the time period between pausing and resuming BitLocker.  Also, the drive being encrypted is C:.

Next I provide details on the solution (note that you can use this solution to schedule any other task within the task sequence).

Determining Encryption State


I wrote this simple script that looks at the status of Bitlocker encryption.  If the disk is being encrypted, a custom TS variable IsEncrypting is set to TRUE; it is set to FALSE if the disk is not being encrypted.  Download the  ZTI_IsBitLocker_Encrypting.wsf script, remove the .txt extension, and copy it to the Scripts folder of your MDT package (then update the distribution points). Use a "Run Command Line" step to run the script.  This script has to run before the step that pauses encryption.


Pausing Encryption

Here you just use a "Run Command Line" TS step that runs this command:
manage-bde -pause c:

The Pause Bitlocker step is part of a TS group that has a condition to be processed only if the disk is being encrypted.  Add a Task Sequence Variable condition to this Bitlocker Pause group where the variable IsEncrypting has to equal TRUE.


Windows Scheduled Task

Although you can use schtasks.exe to create a Windows Scheduled Task, not all possible configurable settings can be set by this tool (such as to run the task even if the system is not plugged-in to a power outlet).  This is why I used Task Scheduler to configure all the options I needed.  The trigger start and expiration time need to be configured, but later during deployment the task sequence will change these times to X hours/days into the future. The goal is to resume BitLocker not at a fixed time in the future (the task sequence may be used for years and that fixed time some day may be in the past) but at a calculated time after the time sequence ends.

These are the settings for my scheduled task.


I then exported my scheduled task to an .xml file and called it resumeBitlockerSchedTask.xml.


Create Scheduled Task Package


Create a ConfigMgr package that has the following files: The resumeBitlockerSchedTask.xml obtained in the previous step, createBLST.bat and createSchedTask.vbs.  Remove the .txt extensions after you download the files. Create a program in the package that runs createBLST.bat.  This batch file will call the createSchedTask.vbs script, which will modify the XML file.  The batch file will then use the modified XML file to create the scheduled task. Note that the batch file is set to use the following XML file but you can change it if needed: c:\windows\temp\logs\resumeBitlockerSchedTask.xml. The task sequence will have copied the XML file to this location prior to the script modifying it.

createSchedTask.vbs

This script will modify the resumeBitlockerSchedTask.xml file by adding the configured time period to the trigger start and end time. The following variables need to be configured at the beginning of the script.

intPlusHours = 5
intPlusDays = 0
intPlusDaysForEndTime = 2 
sLogFile = "c:\windows\temp\logs\createSchedTask.log"
sXML2Modify = "c:\windows\temp\logs\resumeBitlockerSchedTask.xml"

intPlusHours indicates how many hours into the future the trigger start time should be set to (5 hours in this example).

intPlusDays indicates how many days into the future the trigger start time should be set to (0 days in this example).

intPlusDaysForEndTime indicates how many days into the future the trigger end time should be set to (2 days in this example).

sLogFile indicates the full path to where you want the log file to be created (include the name).  The c:\windows\temp\logs directory gets created at the beginning of the TS and all custom logs are created there.

sXML2Modify indicates the full path and name of the exported scheduled task XML file to have the trigger start and end times modified.  In this case, it is in the same logs location (the task sequence copies it there from the package you created  before it is modified).

This is the TS step that will run the program in this package.


Copy XML file to Logs folder


A Run Command Line TS step is used to copy the XML file from your package to the Logs folder.  Configure the step to use the package and use the xcopy command as illustrated below.  This step will be placed in the TS prior to the step that creates the scheduled task.


Steps in Task Sequence

Putting it all together, this is how the relevant steps look in the TS.

The Wait one minute step just runs a script that pauses for one minute.  You can get details on this at the end of this blog post. You don't really need the "Dump Variables" step unless you want to look at their values from a text file.

SCCM

Hierarchy Changes in ConfigMgr 2012 SP1

$
0
0

This expands on my post Hierarchy Changes in SCCM 2012 by adding SP1-specific information.

Cloud-based Distribution Point

You can now have a distribution point (DP) in Windows Azure.  You can specify in which geographic region the content will be stored.  Clients in that specific region will have fast access to the content (clients in a remote region can also access the content if you wish).  Intranet and Internet clients can access a cloud-based DP, and you can use it as a fallback DP.  

Limitations

  • You can't host software update packages on a cloud-based DP but you can just configure your software updates deployments to fall back to the Microsoft software updates servers if needed.
  • Does not support PXE or multicast deployments
  • Can't be configured as a Pull or Source DP.
  • Does not provide content for a task sequence (TS) deployment configured to "Download content locally when needed by running task sequence" (but does if the TS is configured to "Download all content locally before starting task sequence").

Check this Microsoft article for more information.


Pull Distribution Point

You can now designate a distribution point as a Pull DP so it pulls content from one or more source DPs specified by you.  This allows you to offload the work of a site server of sending content to the Pull DP.  The site server just notifies the Pull DP that it needs to pull content from its source(s).  This also can enhance and speed-up the distribution of content across a hierarchy spanning geographical regions (the source DP can even be in a different forest).

Limitations

  • You can't configure a DP that is on a site server as a Pull DP.
  • A Source DP must be configured to use HTTP communication (Pull DPs can use HTTP or HTTPS).
  • A Cloud-based DP can't be a Pull DP or a Source DP.
  • A Pull DP does not honor configured rate limits or bandwidth throttling settings.
  • The Prestaged content configuration overwrites the Pull DP configuration.
For more information see this Microsoft article.


Expand a Stand-alone Primary Site into a Hierarchy


You can now introduce a Central Administration Site (CAS) to an existing stand-alone primary site.  This effectively allows you to have a hierarchy with multiple primary sites.  

Limitations

  • You can expand only one existing primary site into the new hierarchy.
  • Once you have expanded the primary site, the only way to remove it from the hierarchy is to uninstall it (you can't detach it).
  • You must stop all active migration activity (if any) before you expand the primary site.
  • The following site-system roles must be uninstalled before you expand the primary site: Active Intelligence synchronization point and Endpoint Protection point.


Merging and Migration

You can migrate an existing ConfigMgr 2007 SP2 or ConfigMgr 2012 SP1 infrastructure to ConfigMgr 2012 SP1.  SP1 for ConfigMgr 2012 allows you to merge a ConfigMgr 2012 SP1 hierarchy from another organization into your ConfigMgr 2012 SP1 hierarchy as well as to migrate data from your ConfigMgr 2012 SP1 lab environment to your ConfigMgr 2012 SP1 production environment.  For more information see this Microsoft article.


Software Update Point Failover

SP1 for ConfigMgr 2012 allows you to have more than one Software Update Point (SUP) at a primary site. This fault tolerance feature allows your clients to failover to another SUP if the one they are using fails. Network Load Balancing (NLB)'s failover and load balancing features are more robust but more complex to setup.

Limitations
  • If the SUP that a client is using fails, the client continues to attempt to use it for approximately two hours.  If the SUP is still down, the client then switches to another SUP in the same site.  However, the client will not switch back to the original SUP (even if it is operational) unless the SUP that it is currently using fails.
  • There's a network performance hit when a client switches to another SUP to scan for software updates.  Estimate about 45 MB of additional data transfer per client.
  • You can install only one software update point at a secondary site.

For more information see this Microsoft article.

SCCM

ConfigMgr Infrastructure to Support Internet Clients

$
0
0
In this post I provide information that can be used to assist with the design of a ConfigMgr 2012 infrastructure to manage Internet-based clients.

Security must be taken into consideration when designing your ConfigMgr infrastructure.  Although PKI is used for authentication and encryption, the clients will be connecting to your on-premises ConfigMgr server(s) from a vast and unsecured public network: the Internet.

Before you start working on supporting Internet clients, you may want to verify that you'll be able to accomplish your goals.

Client Features Supported


  • Inventory
  • Software distribution
  • Software updates
  • Software metering

Client Features Not Supported


  • Client deployment over the Internet, such as client push and software update-based client deployment. 
  • Automatic site assignment.
  • Network Access Protection (NAP).
  • Wake-on-LAN.
  • Roaming (clients non-deterministically select a site system regardless of bandwidth or location)
  • Operating system deployment (but you can deploy task sequences that do not deploy an operating system)
  • Remote control.
  • Out of band management.
  • Software deployment to users unless the Internet-based Management Point (MP) can authenticate the user in Active Directory Domain Services by using Windows authentication (and an Active Directory trust). 

Site System Roles Supported

  • Management Point
  • Distribution Point
  • Fallback Status Point
  • Software Update Point


Placement of ConfigMgr Servers

There are different ways to place your ConfigMgr servers to support Internet clients. Where you place them depends on the level of security you are required or willing to implement.  In all scenarios below, the site system servers supporting intranet clients were removed from the graphics for clarity.

The external firewall allows incoming HTTPS traffic to the site system servers supporting Internet clients (HTTP for traffic going to Fallback Status Point).  See this Microsoft article to determine what ports need to be open in the internal firewall for ConfigMgr-related traffic, and this article for Active Directory traffic.

Note that you can avoid opening the SQL port for communication between the Management Point in the DMZ and the SQL server hosting the ConfigMgr database if you place a replica of the site database on the Management Point system (but you must allow the traffic of the site server publishing the database replica).

When deploying site systems in an untrusted network, such as the DMZ, select the Require the site server to initiate connections to this site system option so the site systems don't initiate connections to your trusted network.  Note that a Site System Installation Accountis needed to deploy the site system.

DMZ Servers in a different Active Directory Forest


If Forest B trusts Forest A, then user policies are also supported.  The internal firewall would allow the one-way AD Trust traffic through, as well as communication between the ConfigMgr site server in the Intranet and the site system servers in the DMZ.


DMZ Servers in the same Active Directory Forest

This scenario is similar to the first one, with the main difference being that the site system servers in the DMZ belong to the same AD Forest as the primary site server in the intranet.  To protect domain controllers from being accessed from an untrusted network (by the ConfigMgr servers in the DMZ), a Read-Only Domain Controller (RODC) is placed in the DMZ (internal firewall must allow DC replication traffic from the intranet to the DMZ).


No ConfigMgr Servers in the DMZ

In this scenario the site systems supporting Internet clients are in the Intranet (except the Fallback Status Point), and their services are published to the Internet via a Web Proxy such as Microsoft ISA or Forefront Threat Management using SSL Bridging or Tunneling (SSL Bridging is recommended as it is more secure).  The site systems in the intranet can be configured to support only Internet clients or both Internet and intranet clients.


Fallback Status Point
The Fallback Status Point (FSP) requires special consideration because you can have multiple FSPs in a ConfigMgr site (such as one in the Intranet and one in the DMZ) but a ConfigMgr client only talks to one (the one that it talks to when the client is installed). 

If your ConfigMgr site supports clients whey they are connected to the intranet or Internet, they'll attempt to talk to the same initial FSP regardless of their location.  In my opinion, if I have to choose, I prefer that they can talk to it from the Internet, otherwise if there are issues with the client we have no way to gather troubleshooting information unless we have access to the client system.  If you have Internet clients that never connect to the intranet then you could setup an independent ConfigMgr infrastructure in the DMZ with its own FSP.


SCCM

Deploying Windows Fully Patched

$
0
0
In this post I describe one way of deploying Windows fully patched.  I use the Microsoft Deployment Toolkit (MDT) to create my reference image.  I then import the image into ConfigMgr to deploy it to computers.

Installing Updates in MDT

I have the MDT task sequence install Windows on a virtual machine (VM) to create a hardware-agnostic reference image.  By default, an MDT task sequence includes two steps to install Windows Updates after Windows is installed and before it is captured into a .WIM file (to become the reference image).  I use these steps to install updates that were released after the release of the version of the operating system being deployed.

For example, I'm using a Windows 7 SP1 installation media which MDT uses to deploy Windows.  Any updates released after SP1 are not included in my deployment.  The first MDT step to install updates is called Windows Update (Pre-Application installation), and it applies updates before applications are installed.  The other step is the Windows Update (Post-Application installation) and runs after applications are installed.  The two steps are actually the same but run at different times.

The Windows Update task sequence step installs all applicable updates from the Microsoft Updates web sites by default (the VM should have access to the Internet for this to work).  If you don't want to install applicable updates from Microsoft Update, the other option is to install updates from Windows Server Update Services (WSUS).  If you have WSUS, any authorized updates that are applicable will be installed.  To configure the MDT deployment to use WSUS instead of Microsoft Update add the following entry to the customsettings.ini file (in the Rules tab of the deployment share properties):

WSUSServer=http://wsusServerName

(replace wsusServerName with the name of your WSUS server)


Blocking Updates in MDT

One problem that you may run into is that there may be an update that is applicable that you don't want to install.  You can use the WUMU_ExcludeKB property in customsettings.ini to exclude an update.  In this example, I exclude multiple updates:


I ran into a problem recently where Internet Explorer (IE) 10 wouldn't be blocked from Windows Update using the WUMU_ExcludeKB property when deploying Windows 7 SP1. I solved this problem by using the IE 10 Blocker tool from Microsoft, which blocks the automatic delivery of IE 10 via the Automatic Updates feature of Windows Update.

In MDT, an IE 10 Blocker application is created that runs the ie10_blocker.cmd /b command:


and then the application is installed before the first Windows Update step in the MDT task sequence:


You can undo this blocking on a system that has run the blocker tool by deleting the following registry key or setting its value to 0:

HKLM\SOFTWARE\Microsoft\Internet Explorer\Setup\10.0\ DoNotAllowIE10


Installing Updates during ConfigMgr Windows Deployments

In the ConfigMgr 2012 task sequence, you can use the Install Software Updates step to install updates that were not included in the reference image (they may have been released after the reference image was created).


This step has two configuration options: Mandatory Software Updates and All Software Updates.

Mandatory Software Updates installs updates that have been deployed as required to a collection that the target system belongs to.

All Software Updates installs updates that have been deployed as available to a collection that the target system belongs to.


SCCM, OSD

Run Command If Computer is Not a Member of AD Group

$
0
0
Recently Gary Smith added a comment to my blog post Use SCCM to Remove Users from Local Administrators Group.  He wanted to uninstall software using the "msiexec /x" command if the computer where the script is running is not a member of an Active Directory (AD) group.

So I put this VB script together that runs a command --or two-- if the computer is not a member of the AD group specified by you.  The idea is that being in the group authorizes the computer to <fill_this_blank_with_your_need>.  If the computer is not in the group, then it is not authorized and you can take action by running a command or two.

To use the script save it to a file with the extension .vbs (i.e. runCommandIfNotInGroup.vbs).  You can run the script from the command line or from a SCCM package program (include the script and any file needed by your command(s) in the package) using the following syntax:

cscript.exe runCommandIfNotInGroup.vbs

Before running the script, you need to configure a few things:


  • Replace the values for variables commandToRun1 and commandToRun2 with the commands you want to run.  
  • Replace the value for the strADgroup variable with the LDAP path to your AD group.
  • If you are not running a second command, remove the line that starts with "Return2".
  • If you have more commands to run, add a commandToRunX variable for each command below the line that starts with commandToRun2, where X is the numerical order of the command to run (the next one would be 3).  Also add a corresponding ReturnX line beginning below the line that starts with Return2.  Just copy the line that starts with Return2 and paste it below it, replacing Return2 with ReturnX and commandToRun2 with commandToRunX.


' Author: Romano Jerez, http://www.netvnext.com
' September 2013

Set objShell = WScript.CreateObject("WScript.Shell")

commandToRun1 = "notepad.exe"
commandToRun2 = "calc.exe"

strComputer = "." 
Set objWMIService = GetObject("winmgmts:\\" & strComputer & "\root\CIMV2") 

Set colItems = objWMIService.ExecQuery( _
    "SELECT Name FROM Win32_ComputerSystem",,48) 

For Each objItem in colItems
   strHostName = objItem.Name
Next

strHostName = strHostName & "$"

 strADgroup = "LDAP://CN=TestGroup,OU=Test OU,DC=CORP,DC=NETvNext,DC=COM"
Set objADGroup = GetObject(strADgroup)

bAuthorized = 0

        For Each objADMember in objADGroup.Members
          If objADMember.Class = "computer" Then
             If objADMember.samAccountName = strHostName Then
                bAuthorized = 1
             End If
          End If
       Next


        If bAuthorized = 0 Then
          WScript.Echo "Not authorized" 
          Return1 = objShell.Run(commandToRun1,1,True)
          Return2 = objShell.run(commandToRun2,1,True)
        Else WScript.Echo "Authorized"
        End If


 Set objADGroup = Nothing

SCCM 2012 OSD - Deploying Windows using Stand-alone Media

$
0
0
In this post I describe how to deploy Windows 7 or Windows 8 to systems located on remote locations isolated from the network and with no connectivity to the SCCM 2012 infrastructure.

Problem
Sometimes an organization may have remote branch locations with a few desktop systems and no server-type computer to be a distribution point. Although a distribution point is supported on Windows 7 (with limitations), initially there's no Windows 7 (or greater) OS on any workstation.  Or the branch location is segmented off from the corporate network due to security or bandwidth limitations. Yet the organization has the need to deploy the Windows image that SCCM is deploying to well connected computers.

Solution
SCCM allows you to copy your Windows image, task sequence and all of its referenced packages or applications to media (CD/DVD or USB).  You then use this media on remote systems to install Windows on them without the need to communicate with the SCCM infrastructure.

Requirements

  1. The task sequence that you use must have a boot image configured.
  2. The content referenced by that task sequence must be distributed to a distribution point where you have read access.
  3. If you use USB media, it must be connected to the same computer where you run the wizard.


How
In the SCCM console, click on "Create Task Sequence Media" in the "Task Sequences" node and select "Stand-alone media".
In the next page of the wizard you select the media type (CD/DVD or USB). In this example, we select CD/DVD and indicate the path and file name.  Note that if the path contains a folder, you must have created it prior to running the wizard.  
Complete the wizard by specifying an optional password to protect the media, the task sequence that you want to use, and the distribution point(s) where the content referenced by the task sequence can be copied from.

If the CD/DVD media is too small, SCCM will store the content on multiple CD/DVDs, adding a sequence number to each output file.  When the stand-alone media runs, SCCM will prompt for the next media.

Limitations
The following is not supported for stand-alone media.

  1. Auto applying device drivers
  2. Installing software updates
  3. Installing software before the operating system
  4. User-device association for user device affinity
  5. Dependencies for applications
ConfigMgr

Viewing all 63 articles
Browse latest View live