Quantcast
Channel: NETvNext Blog
Viewing all 63 articles
Browse latest View live

Hierarchy Changes in ConfigMgr 2012 R2

$
0
0
This post expands on my previous post Hierarchy Changes in ConfigMgr 2012 SP1 by adding R2-specific information.  Note that the Active Directory schema extensions did not change from previous versions of ConfigMgr 2012 and ConfigMgr 2007.  There's no need to extend the AD schema if it has already been extended for the mentioned previous versions.

Certificate Registration Point
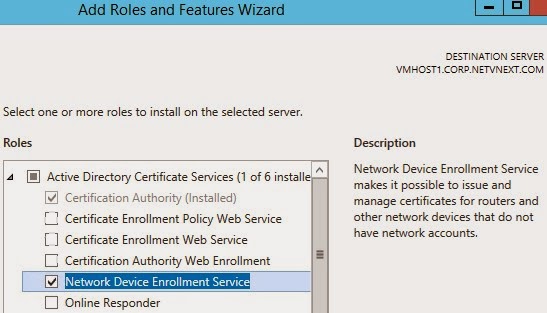
This is a new site system role that integrates with Active Directory (AD) certificate services and and the Network Device Enrollment Service role.  The Network Device Enrollment Service role is part of the AD certificate services and must be installed and configured first.  Note that the certificate services must be installed on Windows Server 2012 R2.


Next, the ConfigMgr Certificate Registration Point should be installed, which allows Configuration Manager the enrollment of authentication certificates to devices that it manages.  This allows the ConfigMgr administrator to create and deploy certificate profiles necessary for users to initiate VPN and wireless connections on iOS, Windows 8.1, Windows RT 8.1 and Android devices.   

After installing the Certificate Registration Point, the provided ConfigMgr Policy Module must be installed.You'll find the installation files in the following path of the ConfigMgr 2012 R2 installation media: 

<ConfigMgrInstallationMedia>\SMSSETUP\POLICYMODULE\X64

The files are PolicyModule.msi and PolicyModuleSetup.exe.

Distribution Points on a Site
In SCCM 2012 RTM and SCCM 2012 SP1, each primary and secondary site supports up to 250 distribution points.  In SCCM 2012 R2, each primary and secondary site supports up to 2000 additional distribution points configured as pull-distribution points.  This means that the maximum number of supported distribution points on a site is 2250 with 2000 of those being pull-distribution points.

ConfigMgr and Windows Intune
Although Windows Intune is not part of the ConfigMgr hierarchy, I'm adding this section because in my opinion anyone designing ConfigMgr hierarchies should be aware that integrating ConfigMgr 2012 R2 with the latest version of Windows Intune permits a deeper level of device management, such as granting the administrator more granular control.  More details on this Microsoft blog post.

SCCM

Tips Migrating SCCM 2007 to SCCM 2012

$
0
0
In this post I share a few tips regarding migrating from System Center Configuration Manager (SCCM) 2007 to SCCM 2012 SP1 or SCCM 2012 R2.  This expands on my post Planning a Migration from SCCM 2007 to SCCM 2012.

1) Credentials to access source site server

As illustrated below, the migration wizard indicates that the account needed to access the SMS Provider on the SCCM 2007 site server only needs Read permissions. However, if you click to "Enable distribution point sharing for this source site" and then upgrade an eligible distribution point (DP), the account also needs Delete and Modify permission to the Site class.


2) Distribution Point Upgrade

You can upgrade an eligible DP that you have shared in the SCCM 2007 hierarchy with clients in the SCCM 2012 hierarchy. If you do so, check the following tips.

Ensure that you first migrate the packages that are deployed to the SCCM 2007 DP because only the content of packages that you have migrated is converted into the single instance store format required in the destination hierarchy.

When you upgrade a branch distribution point, first uninstall the SCCM 2007 client on it, otherwise the content previously deployed to it is removed during the upgrade and the upgrade will fail.

If you upgrade a distribution point that is located on an SCCM 2007 secondary site, the secondary site is uninstalled (and not reinstalled in the SCCM 2012 hierarchy).  As a result, the site system server is removed in the SCCM 2007 hierarchy and any remaining DPs on the site become orphaned.  Check for secondary sites before upgrading a DP.

Remember that once the DP is upgraded, it will no longer be able to provide content to SCCM 2007 clients that may remain in the SCCM 2007 hierarchy.

3) Migrating Clients

Plan to migrate clients in phases to minimize network bandwidth utilization and server processing. A 2007 client being upgraded not only downloads the client installation files but after the 2012 client is installed it has to send its full inventory to the SCCM 2012 site (which needs to be processed by the site server).

Migrate the objects needed by the clients before they are migrated (such as packages) so they continue to be managed in the new SCCM 2012 hierarchy as needed.


Useful Links


Software Updates Search in SCCM 2012

$
0
0
This post illustrates how to use the Software Updates search feature in System Center 2012 Configuration Manager (SCCM 2012) and System Center 2012 R2 Configuration Manager (SCCM 2012 R2).  Obtaining just the updates that you need in a search result makes it easier to download, deploy or create a software update group.

Under Software Library>> Software Updates>> All Software Updates you see all software updates that you have configured SCCM to synchronize from Microsoft Updates (just the metadata not the actual files).  If you don't see the updates that you need or any update see the troubleshooting section at the end.


Let's pretend you need to have a software update group and/or software update deployment package for all security and critical updates released in 2013 for Windows 7, Windows 8 and Windows 8.1.  To define our search, click on Add Criteria on the right of the search box and select the following fields: Date Released or Revised, Expired, Product, Superseded and Update Classification.


Then click on Add Criteria again to add two more Product fields and one more Update Classification field.  Then configure the values for each search field as indicated below.


Now when you click on Search you'll get only the updates specified in the search criteria.  You may want to save your search criteria so you don't have to repeat all your work.  Click on Save Current Search and give your search criteria a name.


The next time you want to search on the same criteria, click on Saved Searches, Manage Searches for Current Node (make sure All Software Updates is selected on the left pane) and select your saved search.


You can select all the updates in the search result by using the keyboard key combination CTRL + A.  Then you can right-click on the selected updates to perform the desired action.  If you just want to select the updates for the current month to download them (perhaps into an existing deployment package) or add them to a software update group, then display the Date Released or Revised column by right-clicking on any header of the search result window and selecting it.


You can then sort the results by the Date Released or Revised column to easily identify the latest updates, which you can select using the Shift and Ctrl keys.


Troubleshooting

The software updates that you are able to manage are limited by the updates that you have indicated to the software update component that you want to work with.  You configure the software update component by going to Administration>> Site Configuration>> Sites, select your site, click on Settings (in the ribbon), select Configure Site Components and click on Software Update Point.


The Software Update Point configuration includes Sync Settings,


Classifications,


Products,


and Sync Schedule.


To see if synchronization with Microsoft Updates has occurred, check the status under Monitoring>> Software Update Point Synchronization Status.


You can synchronize on-demand by right-clicking on All Software Updates and selecting Synchronize.


If synchronization is not working look at the SMS_WSUS_SYNC_MANAGER component status messages and/or wsyncmgr.log file.


For more information see

ConfigMgr

SCCM OSD - Error 0x80072ee2 Downloading MDT Package

$
0
0
I had an interesting problem while working on a recent project and would like to share my experience.  I had designed and implemented a new System Center 2012 R2 Configuration Manager infrastructure integrated with MDT 2013.  Initial testing of Operating System Deployment (OSD) deploying Windows 7 SP1 was initially successful.  However, when testing deploying Windows 7 to another model it failed downloading the MDT package after the machine joined the domain and got the SCCM client installed.

The failure occurred after the restart following the "Setup Windows and ConfigMgr" step which followed the installation of the drivers.  The same MDT package had already been downloaded successfully previously in the Task Sequence (TS) while in Windows PE. The machine joined the domain successfully and after the error it was able to copy the client logs to a network share.  The error in the client's smsts.log was 0x80072ee2 which maps to "ERROR_INTERNET_TIMEOUT". 

Although I noticed that the same NIC driver was being used in Windows PE and the full Windows 7 installation, I obtained the latest network card (NIC) driver directly from the NIC manufacturer (Intel) and imported it into the driver package (also disabled the older versions of it).  The problem persisted.

Next I considered that I might be running into the download issue fixed by hotfix KB2905002.  I had installed the hotfix on the server side but wasn't being installed when the SCCM client is installed during OSD.  I configured the client part of the hotfix to be installed during OSD using the PATCH property in the "Setup Windows and ConfigMgr" step, and validated that it got installed by looking at the client version after the deployment of Windows 7. Unfortunately the problem persisted.

I then observed that the error occurred only on a newer computer model using a modern network card.  The deployment worked on older computer models. All computers were tested connected to the same port on the local switch. The error occurred randomly on any file part of the MDT package.  I decided to capture network traces on the client and on the server to investigate further.

The network traces revealed the following behavior during failure:
  1. The client requests to download files from the MDT package from the appropriate distribution point by sending "GET" HTTP requests.  It sends one "GET" request per file using an URI similar to (/SMS_DP_SMSPKG$/<MDTpkgID>/sccm?/Tools/x86/<MDTfile>)
  2. Many files are downloaded successfully.
  3. Eventually the failure occurs on a random file from the MDT package.
While downloading a file from the MDT package, I noticed that the client resets the connection with TCP port 80 on the server and then right away opens a second connection to download the same file.  This happens for every file and the file is downloaded successfully, except on the file where the failure occurs (random file). When the failure happens, the client TCP connection requests (SYN packets) to TCP port 80 (after it resets the connection) are not answered by the server (the server does receive them as I captured simultaneous network traces on both client and server).  The client then times out because its three SYN packets part of the three-way TCP connection hand-shake are never answered with a SYN-ACK from the server. This is when error 0X80072ee2 is logged in the smsts.log file.

To capture a network trace on the client side I used Wireshark on a monitoring computer connected to the same network device as the machine where we were deploying Windows 7.  The network device was then connected to the switch port at the wall. Wireshark ran in promiscuous mode and all traffic going to the machine target of the deployment also reached the port where the monitoring machine was. Wireshark's "Experts Info" reported many warnings of type "Previous segment not captured" and "ACKed segment that wasn’t captured", which occurred all over the trace and not just at the start of the capture.  On the server side, the Network Monitor capture marked many TCP acknowledgments (Ack) from the client as "Dup Ack" (duplicates).  All this may indicate a packet loss problem (packets being dropped).

So if there was a packet loss issue, why would the problem appear only on newer computer models?  The newer computer models have more resources, are faster and also have modern NICs. My client had a fast network with most links being fiber optics. Analyzing the network captures in more detail, I noticed that the client and the server were agreeing on using TCP Window Scaling.


Excerpts from RFC1323:

This memo presents a set of TCP extensions to improve performance over large bandwidth*delay product paths and to provide reliable operation over very high-speed paths. It defines new TCP options for scaled windows and timestamps

The introduction of fiber optics is resulting in ever-higher transmission speeds, and the fastest paths are moving out of the domain for which TCP was originally engineered. This memo defines a set of modest extensions to TCP to extend the domain of its application to match this increasing network capability
TCP performance depends not upon the transfer rate itself, but rather upon the product of the transfer rate and the round-trip delay. This "bandwidth*delay product" measures the amount of data that would "fill the pipe"; it is the buffer space required at sender and receiver to obtain maximum throughput on the TCP connection over the path, i.e., the amount of unacknowledged data that TCP must handle in order to keep the pipeline full. TCP performance problems arise when the bandwidth*delay product is large. We refer to an Internet path operating in this region as a "long, fat pipe", and a network containing this path as an "LFN" (pronounced "elephan(t)").
Expanding the window size to match the capacity of an LFN results in a corresponding increase of the probability of more than one packet per window being dropped.  This could have a devastating effect upon the throughput of TCP over an LFN.  In addition, if a congestion control mechanism based upon some form of random dropping were introduced into gateways, randomly spaced packet drops would become common, possible increasing the probability of dropping more than one packet per window

Excerpt from Wikipedia:

Because some routers and firewalls do not properly implement TCP Window Scaling, it can cause a user's Internet connection to malfunction intermittently for a few minutes, then appear to start working again for no reason. There is also an issue if a firewall doesn't support the TCP extensions


To test if TCP Window Scaling was causing the problem, I configured the distribution point not to use it. To do this the registry parameter Tcp1323Opts was set to 0.  See the following Microsoft article for information on how to configure this: 

After restarting the server, the next Windows 7 deployment to one of the new computer models that was failing completed successfully.  

I would have liked to look in a network trace when the client downloaded all the files in the MDT package while in Windows PE to see whether TCP Window Scaling was used but I missed this.  It would be nice to know if the TCP/IP stack in Windows PE is capable of requesting TCP 1323 options during a three-way TCP connection hand-shake because if it isn't, that would explain why downloading all the files from the MDT package in Windows PE always worked.

Although disabling TCP Window Scaling and Timestamps on the distribution point allowed our Windows 7 deployments to continue, I don't recommend to do this without first checking your network devices such as gateways and routers for potential compatibility issues with TCP 1323 extensions.  After all, these extensions are there to utilize the increased network capabilities provided by "fat pipe" networks such as fiber optic networks.


Using Nested Conditions in SCCM Task Sequence Step

$
0
0
It is sometimes needed to configure complex conditions when engineering a System Center Configuration Manager (SCCM) task sequence (TS).  You can add a condition or conditions to a TS step or a group of TS steps.  In this post I illustrate by example adding nested conditions.

Conditions on a group of TS steps
In this example, the TS steps in the group are evaluated if any of the three conditions were True:

  • "DGR" variable is True (this variable was set in a collection)
  • The computer name ends with "DGR"
  • If both, the computer model and the computer name requirements, were True


USMT Task Sequence Gives OS Install Warning

$
0
0
In a recent project I put together a couple custom System Center Configuration Manager (SCCM) 2012 SP1 task sequences.  The first would execute only USMT capture steps saving the state data from a computer being replaced to an external USB drive, and the second only USMT restore steps restoring the state data from the external USB drive connected to the replacement computer.

Although the task sequences did their job, the USMT capture task sequence, when started by the end user from Software Center, would first provide the following warning: "Confirm that you want to install a new operating system on your computer".  This would most likely confuse the end user as she was expecting only the state data to be saved on the USB drive.


I found that this warning was caused by the task sequence being of type "Operating System".


I wondered why the task sequence type was "Operating System" because I created a blank custom task sequence that did not use a boot image and did not have any steps to install an operating system.  I added the necessary USMT capture steps manually myself.

Upon trial an error I found that having any of the following steps in the task sequence would change the type from "Application" to "Operating System":

  • Request State Store
  • Release State Store
  • Capture Network Settings
  • Capture TimeZone Settings
I disabled the first two because I was using a script that would compute the appropriate target location to store the state data in the USB drive and assign it to the OSDStateStorePath variable.  I also disabled the last two because it was more important in this case to avoid the misleading warning than to take advantage of the functionality they provide.


Windows 8.1 Update Needed to Continue Receiving Updates

$
0
0
Today I attended the TechEd 2014 seminar "Deploying and Managing Windows in the Real World" by Ben Hunter, Michael Niehaus and Mikael Nystrom.  They reminded us that Windows 8 devices will no longer be able to install Windows Updates unless the Windows 8.1 Update is installed by the following dates:


  • August 12, 2014 if installing Windows updates using WSUS, Windows Intune or SCCM.
  • May 13, 2014 for consumer customers using Windows Update to install updates.
Michael Niehaus and Mikael Nystrom


For more information, see 

Windows 8.1 Update: WSUS Availability, Extended Deployment Timing

Windows 8.1 Update for x64-based Systems (KB2919355)

Windows RT 8.1, Windows 8.1, and Windows Server 2012 R2 Update: April 2014


Using SCCM to Upgrade Windows 8.0 to Windows 8.1

$
0
0
For the first time Microsoft has rolled-out an update to an operating system as an application.  Users can go from Windows 8.0 to Windows 8.1 by going to the Windows Store and download the update.  In an enterprise with System Center 2012 Configuration Manager (SCCM 2012), administrators can easily upgrade hundreds or thousands of Windows 8.0 computers to Windows 8.1. You don't need to worry about migrating operating system settings and user data.

You can use the standard "push" method to deploy Windows 8.1 using SCCM by pushing the update at a specified schedule.  Admins can also use the "pull" method and make the Windows 8.1 Update "application" available in the SCCM Company Portal (a Web portal), where users can go and "pull" it at their convenience.  

Both SCCM 2012 R2 and SCCM 2012 SP1 support both methods but Cumulative Update 3 (CU3) is needed for SCCM 2012 SP1 (see SCCM OSD support matrix below, which I obtained from a Microsoft session in Tech-Ed 2014).  See this Microsoft article if you are using SCCM 2012 SP1 CU3.

Also see this: Which version of SCCM you need to deploy a particular version of Windows.

Deploying an application using SCCM 2012 is easy (see this NETvNext article for step-by-step instructions).  To deploy the Windows 8.1 update, you would use the standard Windows 8.1 image (WIM file), not a custom image.  The command for the program to run is setup.exe /auto:upgrade as illustrated below.

This is the method that Microsoft used to upgrade systems from Windows 8.0 to Windows 8.1, and they shared their experience here:


A Vision of SCCM and Intune

$
0
0
Yesterday Microsoft VP Brad Anderson, corporate VP for Windows Server and System Center, provided insight into the future of System Center Configuration Manager (ConfigMgr or SCCM) via the Endpoint Zone: Episode 2!. Brad restated Nadella's plan to make Microsoft fit for a "mobile-first and cloud-first world" and many of his statements hint to Windows Intune (soon to be Microsoft Intune) eventually replacing SCCM. In this post I attempt to look into SCCM's future based on Microsoft's actions and stated vision and break down what it means for SCCM professionals.

I've been working with Windows Intune since it was in beta.  When I wrote Windows Intune and SCCM Start Merging two years ago, I didn't foresee SCCM being replaced, but a lot has happened since. Here are a couple important things that have occurred in my opinion. The Economist magazine summarizes the first one: "Microsoft, the king of the desktop age, has been dethroned by the smartphone revolution". The second was summarized by Brad in February: "Windows Intune is ConfigMgr from the Cloud".

Windows Phone is in survival mode. Because there's so much at stake, I believe Microsoft is not ready to call it a sunk cost or adapt and become agile by breaking its different business units into different companies like others are doing (in the last few days Ebay announced that it is spinning off its Paypal unit; Symantec is breaking into a security and an information management company; HP is breaking into a computer and printer company and an "everything else" company). Instead, Microsoft is tweaking other products and business units such as Windows 10 and its cloud services to attempt to rescue Windows Phone.

As explained by Brad in the Endpoint Zone, Windows 10 will allow Microsoft to have one Windows for all flavors: phone, tablet, PC and Xbox; from no screen (embedded) to large screens. Develop an application for Windows 10 and it can be used across all Windows devices (hoping that more applications will be available for Windows Phone and that the Windows Phone interface will look familiar to Windows users). 

Brad said that Windows 10 will also come "natively manageable from the get-go" with one agent for Intune and SCCM. If using Intune, Enterprise Mobility Management (EMM) of Windows phone devices should seem simpler to IT decision-makers than other EMM solutions. Containers for Windows (native in Windows 10), iOS and Android will make it easier for Intune and SCCM to stay away from personal data.

Brad was asked in the Endpoint Zone why Windows Intune was not mentioned in the recent Gartner's EMM magic quadrant report. Brad responded by saying that he had to make a decision on whether to take SCCM and host it in the cloud or rebuild the EMM solution. He decided to rebuild the EMM solution as a legitimate 100% cloud-based architecture "rather than taking the existing product and [hosting] it, which would limit our agility in the future". He said that the architecture needs to lend itself so anybody in the team can update the solution many times a day and that "we could never do that with ConfigMgr". He said this was a strategic long-term investment and that Intune should be mentioned in the report next time.

Another question fielded by Brad in the Endpoint Zone was "When do we use SCCM and when do we use Intune? He said "Rich, sophisticated PC management" will remain an on-premises workload for a while in the future (such as heavy software distribution and operating system deployment). He has the world view that enterprise mobility should be delivered from a cloud service and that clients have a choice: use SCCM and attach to Intune or manage systems entirely in the cloud with Intune. Brad said, "Today, a lot of our mobile device management investment is going heavy into Intune" and "all of rich PC management will remain in ConfigMgr and over time will migrate them to Intune". Brad has always had the view that mobile device management (MDM) and PC management need to converge and that the majority of the conversion will occur in the ConfigMgr team.

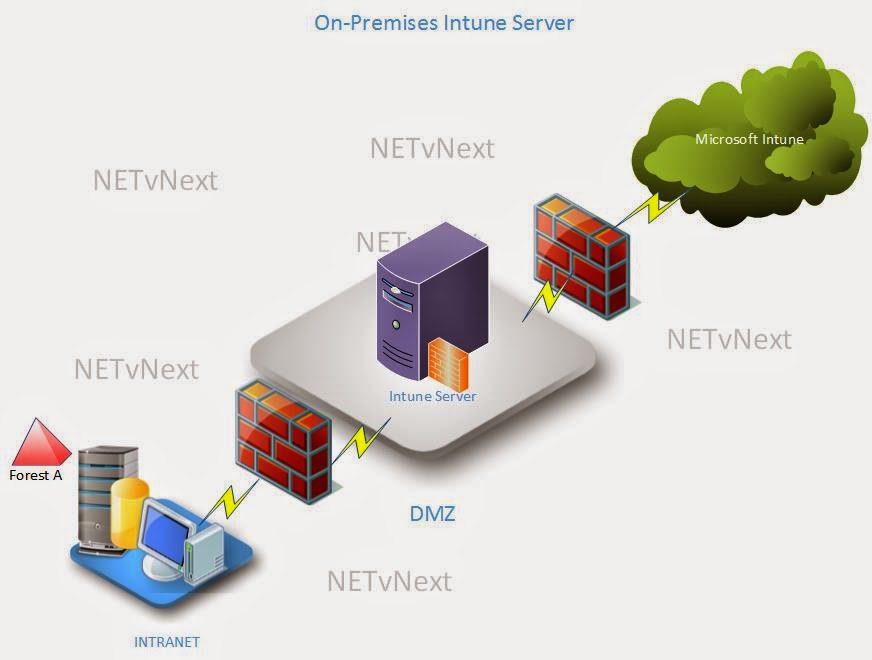
Although the SCCM product is a growing business for Microsoft and is getting more features in its next version, it seems to be in the way of its mobile-first and cloud-first long term vision, and its long term vision may be a matter of survival. This vision may get away with current successful products or services (as happened with TechNet, MMS and TechEd). Think that SCCM will not go away because of the "rich, sophisticated PC management" such as operating system deployment (OSD)? Just as SCCM now has a cloud-based distribution point, Intune could, in a few years, have an on-premises Intune server with a role or roles (such as local content provider) to assist managing those systems that are either not connected to the cloud for security reasons or need to download an OS image or large files:
A company may need to take painful decisions to ensure its long-term profitability, which is the bottom line. Perhaps having merged the SCCM and Intune product teams, now knowing that device management investments are going heavy into Intune, was one of the reasons Mr. SCCM himself, Wally Mead, left Microsoft. In his own words: "the product group had changed, Microsoft had changed..."

So what does this mean for us? For SCCM professionals, we either trust that Microsoft will get it right and embrace Intune or find an alternative. Brad said the following in the Endpoint Zone: "When Microsoft thinks about helping SCCM administrators enhance and progress their careers, Intune-ConfigMgr integration is one of the ways to do it". And if we are not yet convinced, Brad gave us this message in June: "For SCCM admins dead-set against using the cloud, I would say you are missing out." As a result, I will start writing more blog posts about Intune.

November 2014 Intune Service Updates

$
0
0
Microsoft has introduced new exciting updates to Microsoft Intune.  Some of them are:

  • A new dashboard provides quick status details of your managed devices
  • Conditional access to on-premises Exchange
  • Provision and deploy certificates for your managed devices so users can easily access company resources using VPN or Wi-fi profiles
The new dashboard allows you to get a full picture of the status of your managed devices.  You can then click on a tile to get more information or take action on a specific item.

This shows the left part of the dashboard:


and this shows the right part of the dashboard:


The conditional access to on-premises Exchange allows you to block access to on-premises Exchange email unless the device is managed by Intune.

Provisioning and deployment of certificates allow you to deploy email profiles, VPN profiles that configure VPN client settings and Wi-fi settings to make it easier for the users to connect to a corporate Wi-fi.

For more information about the November 2014 service updates to Microsoft Intune see this Microsoft article.


The SCCM ClientPushGenerator Tool Fails

$
0
0
The System Center Configuration Manager 2012 R2 tool ClientPushGenerator.exe allows ConfigMgr admins to push the SCCM client to machines listed in a text file.  There's some brief but good explanation in the "Generate CCR Tool" section at the end of this Microsoft article.

In my current project I used the tool successfully on the first system that I attempted to push the client to.  However, any subsequent attempt would fail with the following code exception.

The SMS provider log reported the following:
"*** [23000][2627][Microsoft][SQL Server Native Client 11.0][SQL Server]Violation of UNIQUE KEY constraint 'ClientPushMachine_G_AK'. Cannot insert duplicate key in object 'dbo.ClientPushMachine_G'. The duplicate key value is (-2)."

I looked a the ClientPushMachine_G table and it had just one record. This record was for the computer that the tool was able to push the client to the very first time.

From the error in the SMS provider log and the table I could see that the tool was trying to use a MachineID of "-2" for subsequent push attempts but this value was already taken by the first record. The table has a key constraint that does not allow records with duplicate MachineID values.

Pushing to discovered clients from the console worked.

I called Microsoft support. The technician said he would research and get back to me. The next day he said that he was able to reproduce the problem on his lab.  However, he explained to me that the ClientPushGenerator.exe tool has the same requirement as the manual client push where the record has to be discovered first.  Indeed using the tool to push it to systems that had already been discovered worked.

Although I've always understood that one of the benefits of the tool is that you don't have to discover a system before pushing the client, I could not find any documentation stating this.  Thankfully, a Microsoft Support Escalation Engineer got involved and indicated that there's a problem with the SQL Stored Procedure that the tool calls: sp_CP_GenerateCCRByName

The escalation engineer provided an updated stored procedure that he put together, and this fixed the problem. There was little risk in modifying the stored procedure because it is only used by the ClientPushGenerator.exe tool.

The updated stored procedure will be included in the next version of SCCM. If you need it for the current version (SCCM 2012 R2), contact Microsoft support.

SCCM 2012 R2 Clients Incorrectly Request Related Content from Proxy MP
$
0
0
In my current project I deployed a Secondary Site server in a System Center 2012 R2 Configuration Manager (SCCM) CU4 environment.  A Proxy Management Point was installed on it.  Soon after, the MP_Location.log started logging the following error frequently:

CMPDBConnection::ExecuteSQL(): ICommandText::Execute() failed with 0x80040E14


MPDB ERROR - CONNECTION PARAMETERS
SQL Server Name     : PAMSSCCM01.ad.here.com\CONFIGMGRSEC
SQL Database Name   : CM_AMS
Integrated Auth     : True
MPDB ERROR - EXTENDED INFORMATION
MPDB Method         : ExecuteSP()
MPDB Method HRESULT : 0x80040E14
Error Description   : Could not find stored procedure 'MP_GetRelatedContents'.
OLEDB IID           : {0C733A63-2A1C-11CE-ADE5-00AA0044773D}
ProgID              : Microsoft SQL Server Native Client 11.0
MPDB ERROR - INFORMATION FROM DRIVER
SQL Server Name   : <secondarySiteServerName>\CONFIGMGRSEC
Native Error no.  : 2812
Error State       : 62
Class (Severity)  : 16

Line number in SP : 1

The error indicates that the "MP_GetRelatedContents" stored procedure can't be found in the secondary site server's database (CONFIGMGRSEC).  I looked at the stored procedures in the database, and this particular one was present in the primary site database but not on the secondary site database.

The secondary site database was running on SQL Server Express 2012 (installed automatically by the installation of the secondary site).  I later installed Service pack 2 (SP2) for SQL but the errors remained.  SQL replication between the primary and the secondary site servers was working properly.

Although the Proxy Management Point appeared to be functioning well, we opened a support case with Microsoft.  The support engineer indicated that this is a known issue where R2 clients reporting to a Proxy Management Point on a secondary site incorrectly request related content.  He said that this bug will be fixed in the next version of the product, and that the error can be safely ignored.  

I'm writing this as it may save time for others.  I did not find any published article from Microsoft on this while I was investigating the error.

Tasks To Do Before Installing SP1 for SCCM 2012 R2

$
0
0
There is some good Microsoft and community information regarding how to upgrade System Center 2012 R2 Configuration Manager (SCCM) to Service Pack 1 (SP1). In this post I provide information regarding what to do before you actually install SP1.

Database Backup and Upgrade Test
Make a backup of your central and primary site databases, and perform a database upgrade test on a copy of your central or primary site DB. Check this post from Johan Arwidmark for information on how to do this.

Validate Prerequisites for Site System Roles
During the upgrade each site system role is uninstalled/reinstalled, and if the prerequisites for a role are not met, the role will fail to install. Check the prerequisites here. For example, for the Application Catalog Web Service Point, HTTP activation wasn't required for .Net Framework 4.5 prior to SP1 but it is for SP1. Also check requirements for potential add-ins and extensions you may have.
App Catalog Web Service Point Fails to Reinstall
Install OS Critical Updates
Install applicable operating system critical updates on SCCM and database servers, and restart the servers if needed, prior to the SP1 install.

Disable Database Replicas for Management Points
If you are using database replica for management points, disable database replication before making a backup to test the database upgrade and before installing SP1.

Remove NLB Clusters
If you are using Network Load Balance for Software Update Points, remove the NLB cluster prior to installing SP1.

Disable Site Maintenance Tasks
Disable all site maintenance tasks while the SP1 upgrade takes place as the upgrade can fail if a database maintenance task runs.

Upgrade SQL Server 2012 Express on Secondary Site
If you have a Secondary Site that uses SQL Server 2012 Express, upgrade it to cumulative update 2 or greater prior to the SP1 install.

Restart SCCM Servers
To ensure there are no pending OS operations from updates or prerequisites, restart the SCCM servers prior to the SP1 upgrade.

More Information
Refer to this Microsoft article for more information about tasks to do prior to the installation of SP1.

Check the following links for information on how to perform the upgrade:


ConfigMgr

Re-index WSUS Database Running on WID

$
0
0
Microsoft indicates that performance degradation occurs over time on a Windows Server Update Services (WSUS) database (DB) without proper maintenance and provides a T-SQL script to re-index and defragment a WSUS 3.0 DB here. This post supplements the script instructions to run it when the DB is hosted on a Windows Internal Database (WID), which is used by many System Center Configuration Manager (ConfigMgr) Software Update Point (SUP) implementations.

These are the steps needed to automate running the script using the sqlcmd utility and Windows Task Scheduler when WID is running on Windows Server 2012 R2.

  1. Obtain the SQL command-line tools (includes the sqlcmd utility) by downloading and installing the SQL Server 2012 SP1 Feature Pack on the WID server
  2. Download and install the ODBC Driver 11 for SQL Server on the WID server
  3. Download and save the T-SQL script in a file with the extension .sql (i.e. WsusDBMaintenance.sql)
  4. Create a task in Windows Task Scheduler to run the script
The sqlcmd command-line syntax provided with the script does not work when WID is hosted on Windows Server 2012 R2. Microsoft's instructions indicate:

sqlcmd-S np:\\.\pipe\MSSQL$MICROSOFT##SSEE\sql\query –i <scriptLocation>\WsusDBMaintenance.sql

but when WID is running on Windows Server 2012 R2 it should be:

sqlcmd -I -S np:\\.\pipe\MICROSOFT##WID\tsql\query -i <scriptLocation>\WsusDBMaintenance.sql

Note: The I- parameter to enable QUOTED_IDENTIFIERS should be used regardless of the operating system.

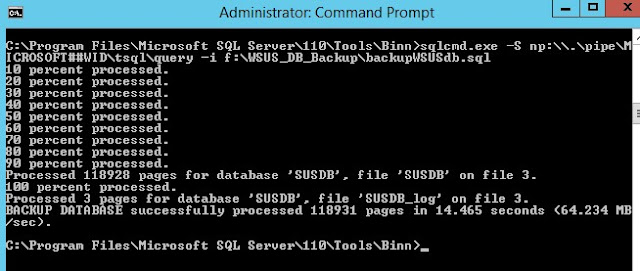
Test the command before you schedule a task:
If you look at the output of the command, the end should look similar to the following:

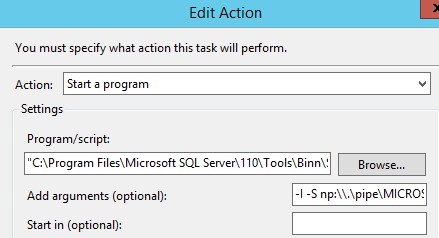
This is how you would configure the command line and arguments in a Windows scheduled task:


The "Program/script" field basically has the full path to the sqlcmd.exe tool.


SCCM


Backup WSUS Database Running on WID

$
0
0
The Software Update Point (SUP) role in System Center Configuration Manager (ConfigMgr) relies on Windows Server Update Services (WSUS).  The WSUS database can be hosted on a Windows Internal Database (WID).  In this post I describe how to backup the WSUS database when hosted on a WID running on Windows Server 2012 R2.

Follow these steps to backup your WSUS database:

  1. Obtain the SQL command-line tools (includes the sqlcmd utility) by downloading and installing the SQL Server 2012 SP1 Feature Pack on the WID server
  2. Download and install the ODBC driver 11 for SQL Server on the WID server
  3. Create the BackupWSUSdb SQL script
  4. Create a task in Windows Task Scheduler to run the SQL script
The BackupWSUSdb.sql script is a text file that contains the following two lines (the second line contains only "GO"):

BACKUP DATABASE [SUSDB] TO DISK = N'f:\wsus_db_backup\WSUS_DB.BAK' WITH NOFORMAT, INIT, NAME = N'WSUSDB - Full Database Backup', SKIP, NOREWIND, NOUNLOAD,STATS = 10
GO

Where f:\wsus_db_backup\WSUS_DB.BAK is the full path to the backup file you want to create (you can change this).  

I use the INIT argument so each backup is not appended to the same file (you can move backup files before the script runs if you want to preserve it).  If you use instead use NOINIT then each backup is appended to the same backup file. You can control the overwriting of the backup file with the EXPIREDATE and RETAINDAYS arguments documented in this MSDN article.

Running the SQL Script

Run the script using the sqlcmd.exe tool using the following syntax (this is one line):

sqlcmd.exe -S np:\\.\pipe\MICROSOFT##WID\tsql\query -i f:\WSUS_DB_Backup\backupWSUSdb.sql

Where f:\WSUS_DB_Backup\backupWSUSdb.sql is the full path to the script.


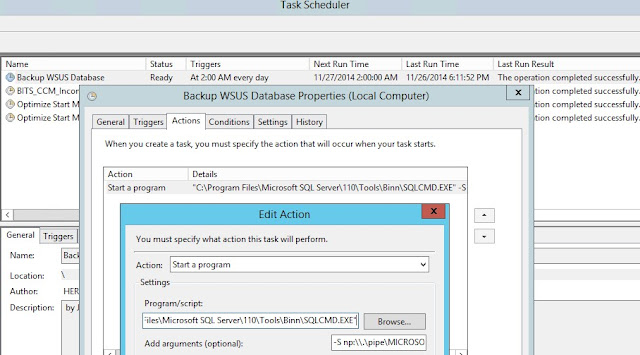
Scheduling the Script

This is how you would schedule the script in Windows Task Scheduler:


Note: I used this Microsoft article as a reference but made changes to make it work on newer versions of SQL and Windows Server and to not append each backup to the same file.
SCCM
Configure Intune Standalone to Manage iOS Devices

$
0
0
Configuring Microsoft Intune standalone to support management of iOS devices is simple. There are four tasks to complete before you can enroll and manage iOS devices: set the management authority to Microsoft Intune, configure the company portal, assign a user license to users and setup device management for iOS devices.

Set the Management Authority to Microsoft Intune
Configure the management authority to Microsoft Intune.  This will allow you to manage devices with the cloud-based standalone Microsoft Intune. The other option would be to set it to Configuration Manager. Be sure that you want to manage it with Intune standalone because the only way to change it is to contact Microsoft support (see https://support.microsoft.com/en-us/kb/3103996).
Management Authority Set to Microsoft Intune Standalone
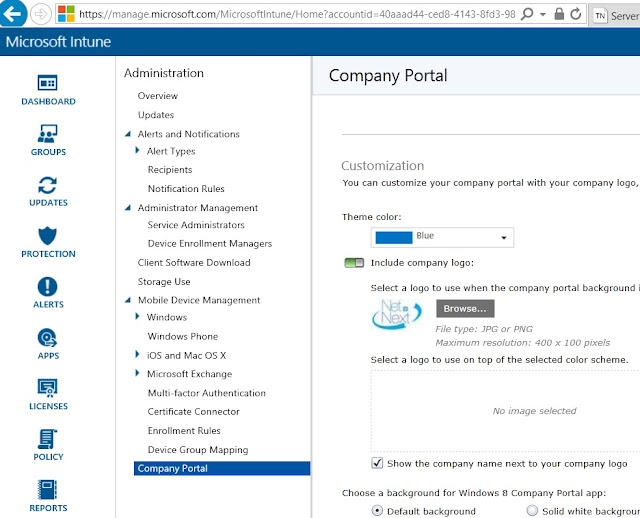
Configure the Company Portal
The company portal is accessed by users to enroll devices, install applications and get contact information for your IT support department.  These are some of the settings you configure.
Configuring the Company Portal
Assign a User License
Assign an Intune user license to a user for whom you intend to manage devices.
Intune User License Assigned to User
Setup Device Management for iOS Devices
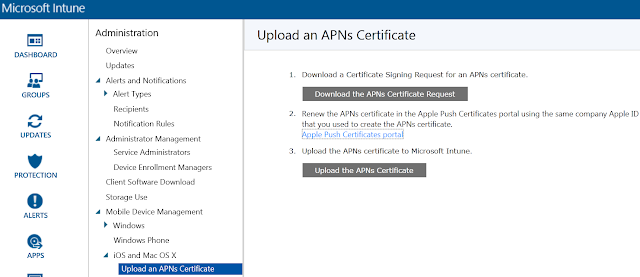
Apple devices require a trust relationship with Intune to allow their management. To establish this trust, your organization needs to obtain an Apple Push Notification service (APNs) certificate and then import it into Intune. Follow these steps to obtain and import the APNs certificate.

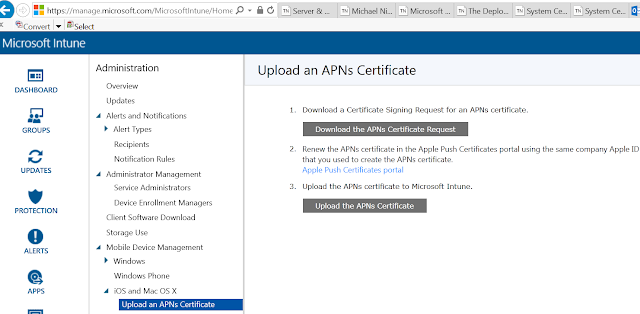
1) In Intune, download a certificate signing request (CSR) file that you will need to request an APNs certificate from Apple.  Click on "Download the APNs Certificate Request" and indicate where to save the CSR file on your computer.

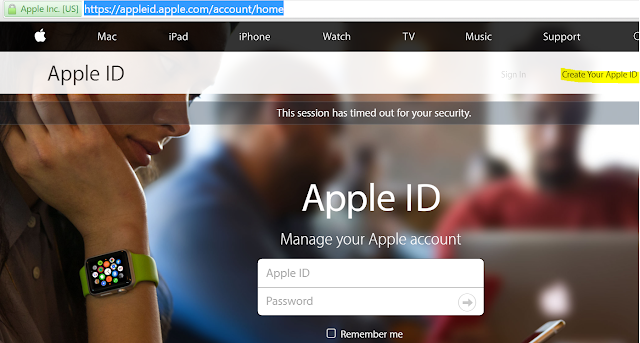
2) If you don't have one, create an Apple ID for your organization at
https://appleid.apple.com/account/home
Creating your Apple ID
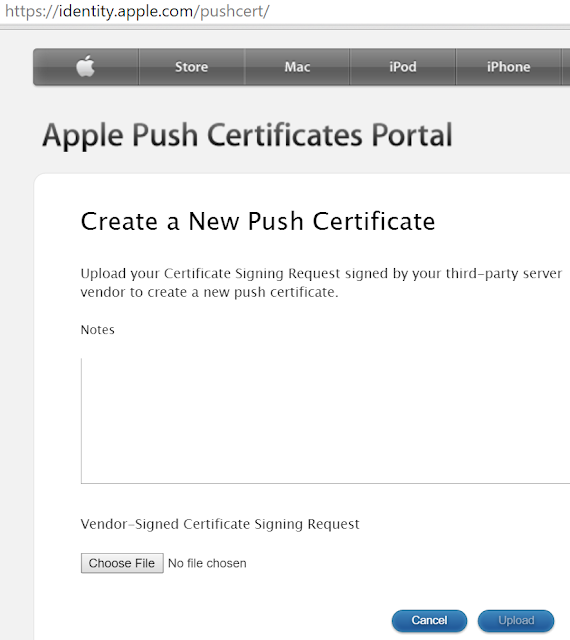
3) Once you have your Apple ID go to https://identity.apple.com to sign in at the Apple Push Certificate Portal where you'll select to create a certificate, accept the terms of use and click on "Chose File" below to upload the CSR file that you downloaded from Intune.
Creating an Apple Push Certificate
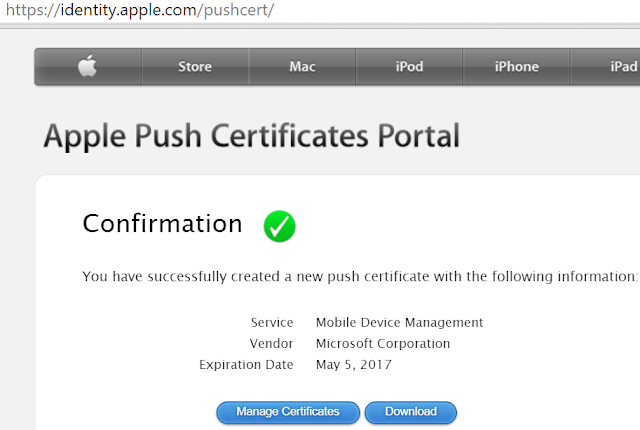
Once the push certificate is created, you can click on "Download" to download it to your computer.  It is a file with the extension PEM.
Download APN Certificate

4) Upload your new APNs certificate to Intune by clicking on "Upload the APNs Certificate" and selecting the PEM file that you downloaded from Apple.
Uploading the APNs Certificate to Intune
You are now ready to enroll and manage iOS devices.
Ready to Enroll iOS Devices

BYOD iPhone Enrollment in Intune

$
0
0
Microsoft Intune Mobile Device Management (MDM) requires devices to be enrolled in order to be managed and access company resources in the "bring your own device" (BYOD) and company-owned device (COD) scenarios. An admin determines the enrollment method based on the device type, ownership, and required level of management (more info on this here).

In this post, I provide information for the BYOD scenario and illustrate how a user enrolls her iPhone in Microsoft Intune. Intune should already be configured to enroll and manage iOS devices. My previous post explains how to do this.

Your users may be a little anxious about letting IT admins manage their devices. You can provide to them this Microsoft article that explains to them what IT can and can't see when they enroll their devices, and what IT can do.

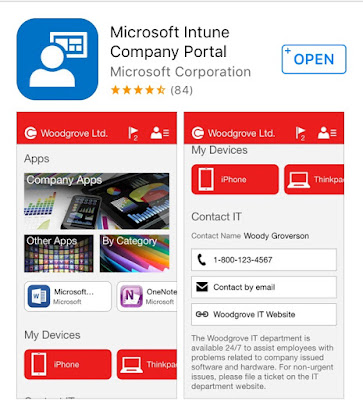
The user first needs to install the Apple App Store and install the Microsoft Intune Company Portal app.
The Company Portal app can now be launched.
The user can then sign in.
The user is then presented with the following information screens.


After the user selects "Enroll", she needs to select "Install" to start the installation of the profile and "Trust" the management of her device.


After selecting "Trust" the enrollment of the certificate takes place.


Once the profile is installed, the device is finally enrolled.

The user is asked if the next page should be opened in the "Comp Portal" app.
After the user selects "Open", the iPhone is setup to access your company portal.

The Intune company portal can now be accessed but the user first has the opportunity to provide feedback.


For information on enrollment of COD iOS devices see this Microsoft article.

BYOD Android Enrollment in Intune

$
0
0
In this post I illustrate how easy it is for a user to enroll her Android phone in Microsoft Intune. I had previously sent this information to her indicating what would happen when she enrolls her phone. 

The first thing the user does is to install the Microsoft Intune Company Portal application from the Play Store.

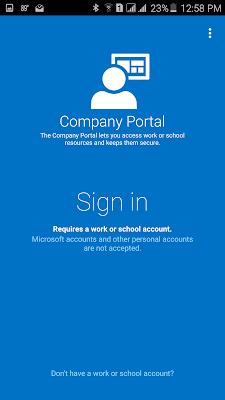
Then launch the Company Portal app and sign-in with the credentials provided by your IT administrator.

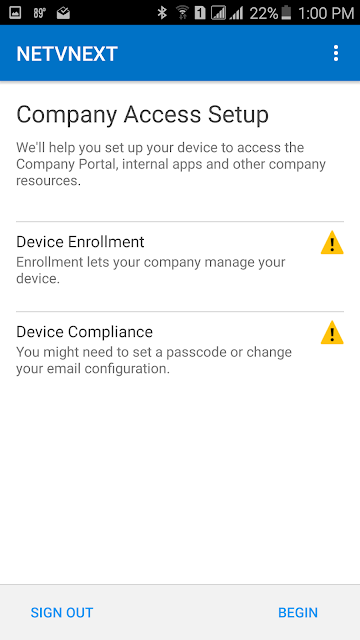
Next tap on Begin on the Company Access Setup screen.

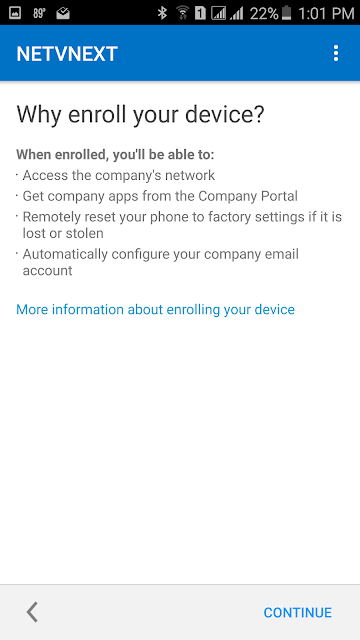
Click on Continue on the Why Enroll Your Device? screen.

On the We care about your privacy screen, you can read what an IT admin can and can't see on your phone.  Click on Continue.

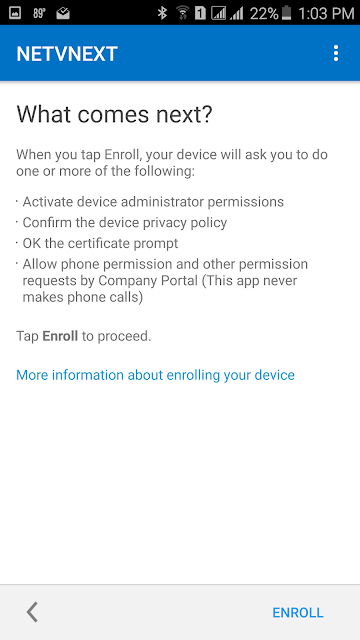
Click on Enroll on the What comes next? screen.

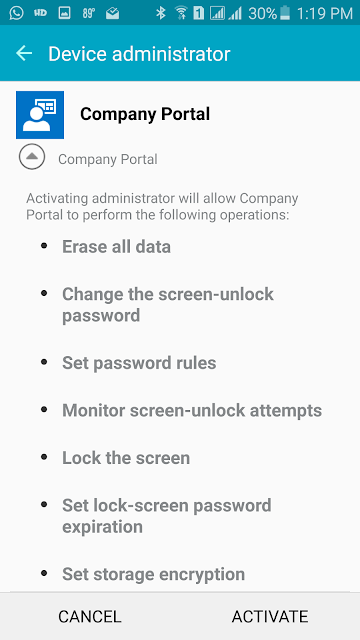
Review the operations that the Company Portal will be able to do by activating administrator and click on Activate.


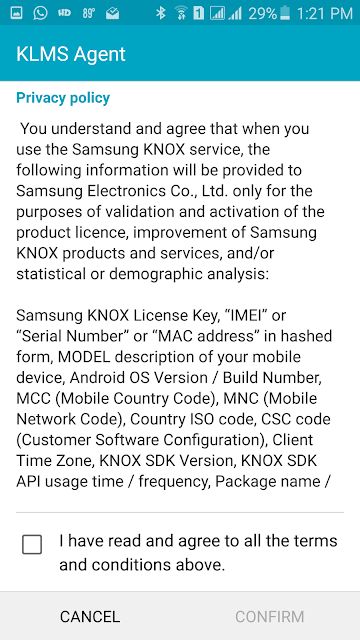
If you have a KNOX device, you have to agree to a privacy agreement for some information from your phone to be sent to Samsung Electronics via their KLMS Agent.


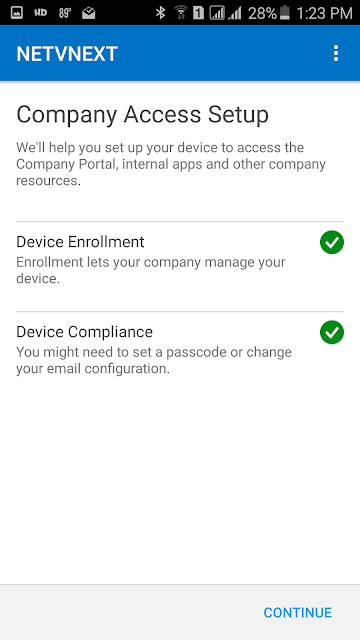
After you tap on Confirm the enrollment process takes place. The Company Access Setup screen is now presented with a green check-mark next to Device Enrollment and Device Compliance.  Click on Continue.


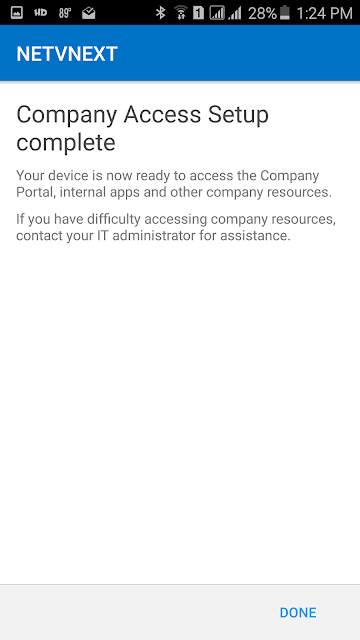
The Company Access Setup complete screen is presented. Click on Done.

You can now launch the Company Portal app on our phone.
The Android phone can now be managed in Microsoft Intune.


Using Upgrade Analytics to Plan and Manage Windows 10 Deployments

$
0
0
Upgrade Analytics is a free Microsoft Web service that collects and analyzes hardware and application data from devices that you plan to upgrade to Windows 10 to identify device, application and driver compatibility issues. It provides tools for organizations to plan and manage the entire upgrade process.

The service is a solution in the Microsoft Operations Management Suite (OMS) and replaces the Application Compatibility Toolkit. It uses telemetry so devices can send the relevant data to Microsoft.

When you identify computers as ready to upgrade, you can export the list to be used in your favorite operating system deployment tool, such as System Center Configuration Manager.

This post provides a high-level overview of the process to use Upgrade Analytics.  Details can be found on this Microsoft article.

Steps to use Upgrade Analytics

1) Sign up
Sign up at
https://www.microsoft.com/en-us/WindowsForBusiness/upgrade-analytics

2) Add Upgrade Analytics Solution
Once you have your OMS account, sign in and click on the settings icon which you'll find on the top right corner (in yellow below).
Add the Upgrade Analytics solution.

3) Enable Telemetry 
Click on "Telemetry" under "Connected Resources"

Subscribe to the solution and grab your commercial key (which you'll use when configuring your client devices).


4) Prepare your clients
Install the following KBs on your client devices (the supported OS versions for upgrade to Windows 10 are Windows 7 SP1 and Windows 8.1):

Windows 7 SP1


Windows 8.1


5) Allow traffic through firewall or proxy
The client computers must be able to communicate with the appropriate Microsoft servers. Check the "Whitelist select endpoints" section of this Microsoft article.

6) Run the deployment script on your clients
Download the script from here:
https://www.microsoft.com/en-us/download/details.aspx?id=53327

Two files are downloaded:

  • ConfigScript.ps1
  • RunConfig.bat

You copy both files to the client systems and run the batch file (which calls the PowerShell script). Before running it, configure the batch file settings.  The basic settings indicate where to create the log file, your commercial ID, and the log mode. This is an example of the settings:


Check this Microsoft article for details on batch file settings.

After you run the script, it takes about 48 hours before the data can be seen in your OMS site. Browse to your portal URL (mine is https://netvnext.portal.mms.microsoft.com).  This is how it looked when my first computer appeared.


This six-minute Microsoft video provides an overview to Upgrade Analytics and its capabilities.


Intune: User Replaces Mobile Device

$
0
0
In the Bring Your Own Device (BYOD) scenario, a user may replace a mobile device being managed by Microsoft Intune for a number or reasons (i.e. the device is broken, lost, stolen). The user needs to be able to access corporate resources from the new mobile device. This article details the steps needed to get the new device into a managed state so the user can access the Microsoft Intune company portal.

The user should enroll the new mobile device in Microsoft Intune. The following links provide information enrolling Android and iPhone mobile devices.


Here I illustrate what happens after the user has enrolled a new iPhone. When the user launches the Intune company portal, he sees two iPhones (the old one and the new one) under "My Devices" (The new device has an "informational" icon because it is being checked for compliance).
The Microsoft Intune administrator should now wipe and retire the old device (this will free up the user's subscription tied to it). Note that if the subscription taken up by the old device is needed to enroll the new device, then the old device should be retired first.

In this example, the Intune administrator goes to "All Direct Managed Devices".

The administrator selects the device to be wiped and retired and clicks on "Retire/Wipe". Note that "Delete" is greyed-out as the device needs to be wiped before it can be deleted.

Here the administrator selects to perform a full-wipe.

Once the administrator confirms the wipe operation by clicking "Yes", the "Retire/Wipe" option is no longer enabled, and the "Delete" option has been enabled. For a device to be deleted, it must be in the retire pending state.
The lower pane shows the management state of the old device.
At this point, the old device will no longer appear under "My Devices" when the user goes to the Intune company portal.

Note that once the retire and wipe operation is complete, the device's status no longer will appear in the Intune administrator console. If the device can't be contacted (i.e. it is broken) you can delete it so it is no longer visible in the Intune administrator console.
Viewing all 63 articles
Browse latest View live